Pages

Showing posts with label Gesso. Show all posts

Friday, 3 February 2023

Creative Artiste February Challenge #90 ~ Anything Mixed Media Goes

Hello Creatives 

Please forgive my absence It has been quite 
some time since I last stepped into blogland. 

The past few months have taken me on a different journey 
and extra care duties made life very difficult to balance. 
Creative time just got smaller and smaller but I'm really 
hoping 2023 will be a little more generous with me time.. 

I have missed seeing your inspirational creations..

our theme is always *Anything Mixed Media Goes* 


This February I'm sharing the love with a journal page layered with 
rice paper and old gelli print strips. Gesso and watercolour washes 
are stamped with french script. Red hearts cut from a magazine 
page are fashioned with machine, hand stitch and lacey strips. 

Here's a peep at what the brown paper envelope holds, 
ATC's created using the very same mixed media supplies.


I hope you will join the Creative Artiste Team HERE 
and share your very own Mixed Media Creations. 


Take good care everyone

Creative wishes for 2023
Tracey xx

Friday, 5 August 2022

Creative Artiste #85 August Mixed Media Challenge

Hello Lovely Creative Friends 

I hope you are all keeping well..??

The past few months have been what can only be described as bedlam, 
incredibly stressful, heightened care duties, house moves and legalities 
not helped by catching Covid which I'm still suffering from it's affects.. 

A big thank you to all that have stuck by me these past months 
it means more than I can say in words.. Myself and family are thankful 
these life hurdles, albeit life changing can be overcome with time.. 

Sooo a scheduled blog post again.. 

our monthly theme is always Anything Mixed Media Goes.


This month I share a small mixed media canvas, layered with leftovers 
found amongst my messy craft desk. Paper doily's, layered texture using 
stencils and paste, buttons and lacy scraps add a little touch of me.. 

Calming down the glued chaos with a wash of white gesso a found washer 
acts as a firm frame for three tree twigs wrapped in silken thread. 

Please join the Creative Artiste Design Team HERE 
and share your Mixed Media creations with us all. 

Take care of yourselves and each other..
Stay safe and creative 
Hugs Tracey xx

Thursday, 3 December 2020

AJJ ~ The meaning of ... Art

 Hello everyone, 

As Decembers Guest Host @ Art Journal Journey 
i'm sharing my second journal spread 

I adore every aspect of art it allows me to explore, experiment and express. 
Nothing compares to the feeling of bringing a blank page to life with colour.. 

Collage and texture paste through stencils helps breaks up this surface 
where alcohol inks are dripped, sprayed and teased around the page. 


The stamped and painted brushes represent a small selection of tools 
I use to help me discover, demonstrate and make visual noise on a page. 


and not forgetting those paint tubes like little houses 
that help keep our precious paints all safe and sound.. 


Art it's within me.. like my beating HEART.. 

Stay safe & creative 
Hugs Tracey xx 

Sharing today's creativity with: 

Simon says Stamp Monday Challenge ~ Focus on Alcohol Inks

Thursday, 24 May 2018

A5 Journal Cover

Hello Creative Friends,

It's Thursday again and my turn to share another
That's Crafty Creation, today using newly released products.

Here's a sneaky peek with the full picture and how to do's over HERE.


Take care & Stay Safe

Creative Hugs
Tracey xx

Wednesday, 27 September 2017

September Tag: Let's sleep...

Hello everyone, I seem to be cutting it very fine with these monthly Tags
it seems that as soon as the month arrives it fades just as quickly.

Today i'm sharing tag number #9 using the same prompts used
 each month for those of you that may have been following.


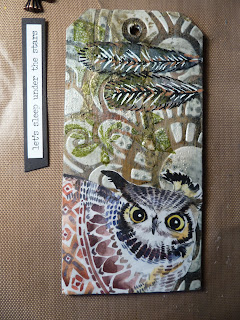
Here in words and pictures is my September Tag:

Covered in a coat of clear gesso, leather corset and warm tan acrylic paint,
modelling paste has been pushed through the Big Floral Stencil.


Paper feathers have been added as collage and coated in matt medium,
Pearl shimmer paint is painted all over and Gold paint allowed to drip down the Tag.

Black Soot Distress Oxide has added more detail rubbed through the Faded dots stencil.
A gentle application of clear Gesso seals most of the design without moving it too much.


Stamps from Card-io's blown away set are stamped on using Archival leaf green.

I found a very Quirky Owl image in a free papers booklet from 
Making Cards February 2017 edition, the same place I found the feathers.

Cut out I adhered the Owl to the bottom of the tag as I wanted 
to keep some of the Big Floral stencil visible.


A few doodles bring out the details on the feathers, a found sentiment from Tim Holtz Chit Chat book *Let's sleep under the stars*, along with some fibres and a gem or two..

 The final touches are ready to be added.


With the addition of glossy accent eyes
My September Tag is now complete:


Can't believe I managed to complete this without even a hint of gilding wax!!
Only three more to go until my full year's worth is complete.

Thank you for sticking around everyone.

Wishing you all warm hugs and lots of creativity.
Tracey xx

Tuesday, 5 September 2017

Warm Hugs..!

I've been itching to use these candle substrates by Paperbabe, as soon as I saw them
I had so many ideas of how they could be used. I jotted down a few
as ideas can easily be forgotten when times are busy.

I decided to incorporate one of my ideas with the latest Sketch challenge, 
Here in words and pictures is my Warm Hugs Card.


Using an A4 sheet of stamping card I painted it sporadically in white Gesso and dried with a heat tool. When completely dry I Stamped all over the page both large and small Pom Pom stamps from the DesignA Knit set and heat set with white embossing powder.
Spritzed with Bayou Gold starburst spray. The embossed pom poms act as a resist, the Gesso resists the spray slightly and the plain card takes the full colour of the spray.
A great effect using just one colour.

Cut to the required size I used the left over card to cut the banner shapes from the
Paperbabe Sketch. I also cut and coloured a circle another Sketch prompt.


I found just enough space on my background to stamp this Paperbabe sentiment. 
I love how it leaves  a blank area for you to stamp or write a name of your choice. 
This time I just stamped the word *your* also from the DesignA Knit set.

                     
Coloured with neopastels I coated the  candles in clear versamark and heat embossed 
with clear embossing powder accentuating those waxy candle drips.


With the Sketch prompts edged in gold embossing powder and layered onto the card
my *Warm Hugs* Card is complete.


I love how the colours blend so well together from subtle creams to rich golds, the romance of the sentiment and the reference of light and life. A real joy to make.

Take Care everyone until next time.

Creative Hugs
Tracey xx

I'd like to enter this into the
Paperbabe Stamps Challenge #55 Sketch

Crafty Supplies:

Paperbabe: DesignA Knit Stamp Set
Paperbabe: MDF Candle Substrates
Stamping Card
White Gesso
Versamark Embossing Ink
White Embossing Powder
Lindy's Stamp Gang Sparkle Spray: Bayou Boogie Gold
Stampendous Fine Deatil: Gold Embossing Powder
Caran D'ache neocolor II pastels

Monday, 31 July 2017

July Tag: Nurture Nature..

Oopps it's the last day of July and I haven't shared my July Tag using those
fabulous prompts from Chris for a mini challenge last year..
Can't believe this is now Tag number 7.
You'd think I would be able to put these together with my eyes closed now but nope,
I forgot everything putting this one together, including to photograph the stages..

Here in words and not so many pictures is my July *Personal Challenge* Tag


Using a Black Tag I painted it in Clear Gesso. 
I then completely forgot to cover with a layer of paint and then forgot to 
cover the layer I forgot with another layer of a different colour. What a donut..!!
I did remember to push Grunge Paste through a stencil and add a strip of lace 
as my collage and then cover the whole Tag in matt medium.

English Red Oxide was dragged down the tag using a dry wipe and Gold DecoArt interference paint dripped down . Stencilled layers have been applied using white Gesso and when completely dry a coating of clear Gesso applied all over.

Fern Leaves by Hobby Art have been stamped onto the tag but I couldn't help think it was all looking a little flat. I'd been here before with my very first Tag thinking it all looked a horrid mess but we were encouraged to keep going... so on I plodded.


For my main focal image I chose an unused PaperArtsy image i'd previously painted with Distress Oxides it was only when I placed this image against the Tag to see if it would fit that I realised I had not put any background colours onto my Tag.. no wonder it was looking a little flat.

So a quick wash of Peeled paint Distress Oxide was applied to mask all that black and my focal image cut out and glued onto the tag. Lots of flat back pearls, gems, sparkly doodles and a glimmer of gilding wax helped bring it to life.


I used my own handwritten words of *Nurture & Nature* added colour
coordinating twine and a dragonfly embellishment to serve as a hanger or tie.

My July Tag is complete.


I must admit the wash really did transform the background  and bring it all together and forgetting to put the coats of paint on first really did make it look a little pants.

Chris's 12 prompts are a revelation and although we had been told we could leave any prompt out anytime, i'm never forgetting one again.

Thank you for sticking with me peeps my August Tag will be shared before we know it.

Creative Hugs
Tracey xx


Friday, 7 July 2017

1, 2, 3 ATC

WELL..!!  I can hear you all say "What's all this Mess?" 
Grab yourself a cuppa and i'll tell you all about it..


Well this project all started with the words *Found* a Theme given for an ATC Swap I contribute to each month. I have so much stored away in pretty jars but the majority of it has little or no importance, just odds and ends hidden away with the hope of discovering that hidden gem each time I rummaged through it...

The Blog Challenge Theme for the next fortnight over at That's Crafty is *Anything Goes* and these little ATC's seemed to fit the bill nicely, showing that you really can create something from nothing.. 
I hope you can pop along and check out all those inspirational makes from the DT and maybe join in as there's a chance to win a £20 voucher to spend in the That's Crafty Store.. 

Here in words and pictures is my 1,2,3 ATC

Covering an MDF ATC in a layer of lace I Gesso'd over the top and added some of those 
bits and bobs, sticking them down with lots and lots of heavy body gel. 


I added micro beads into the exposed gel and then left them for 7 whole days.. yes 7!! 
As the amount of gel used was so thick and I knew these would be travelling to a new destination I needed to make sure that the gel had cured properly and also that those items would stay where I had put them..!


..One week later.
All dry and stuck down firmly.. so time to play.
I coloured each ATC differently using neocolor pastels and covered with mat medium to protect any further movement of colour. These colours were my base coat on which I could build up with more colour.


Now this is my favourite bit, bringing out all the detail by using raw umber paint and coordinating coloured alcohol markers around each element. Creating depth, shade and highlighting those prominent areas with bronze, antique gold and antique silver shimmer paints to give the appearance of reflection of light with a dot and dab of white Posca Pen.

Each ATC is finally edged with a little gilding wax.. and my ATC's are complete..


You really do need something substantial to adhere so much onto as you do not want them to buckle or bend whilst on their travels. The MDF ATC's are fabulous surfaces to work on and I believe they have now found new homes.. hopefully well received.?

Thank you for sharing your time, I hope you have been inspired.
What ever you are up to this week I hope it's a crafty one.

Stay Safe.. Creative Hugs.. Tracey xx


Crafty Supplies:

Bits and Bobs from my own crafty stash!
 Alcohol markers (Browns/Greens/Blues) Not my best ones.
That's Crafty MDF ATC's 
That's Crafty White Gesso
Heavy body Gel
DecoArt Matte Medium
Carn D'ache neocolor II water soluble pastels
DecoArt Raw Umber
That's Crafty Shimmer Paints
Prima Finnabair Art Alchemy Metallique Wax
White Posca Marker Pen

Monday, 26 June 2017

Dance of the Dragonflies

Happy Monday everyone.. 
Can you believe this is the last Monday of the month, where has June gone?? 

It's my turn to share some That's Craft Creativity over on the *That's Crafty Blog * showcasing a project using new paints and surfaces from the That's Crafty range.

Here is a sneak peek of my Dance of the Dragonflies..*


Please fly on over HERE for those *How to Do's*

Thank you for taking time to visit I look forward to sharing more with you 
the same time next week. Until then Take Care and Stay Safe everyone.

Creative Hugs Tracey xx

Friday, 7 April 2017

Lacquer look Book Box..

I do so love this stamp by Paperbabe, I had used it in a project earlier in the year 
but whilst having a clean up & recycle this week I came across this image I had already coloured hiding in a Graphic 45 Book Box. This is what I created using it.. 

Lacquer look Book Box..


I distressed around the image using Tea Dye Distress ink then cut the image to size. Creating faux stitching around the edge I then triple embossing the whole image. 
When dry I created cracks in the embossed image by bending it gently and stained 
them with gathered twigs distress ink to add age.


The image was edged with Stampendous Gold embossing powder and glued onto a 5x7 canvas board that had been painted with gold paint, edged and scribbled over with a wax tealight to create a resist  and black gesso painted on top. When dry areas were sanded back to expose some of the gold underneath.
A layer or two of Mod Podge helps create the Lacquered look.


A panel was created for the spine of the box using a distressed paper off cut.
I stamped the Flower from Paperbabe oriental Zen stamp set as it is the same stamp that is in Mae Lee Dees hair. and used the same colours to replicate the design. The triple embossing & cracking technique was repeated along with the gold embossed edges and distressing of the cracks to marry up both front and side designs.


Ribbon coloured to coordinate with the flower was tied around the box 
to act as a closure and the canvas glued onto the box front securing the ribbon.
Modelling paste has been scraped around the edge of the box using a comb to resemble book pages and left to harden. When dry I covered with a layer of black gesso and highlighted all the raised edges with gilding wax.


A final layer of Mod Podge and brass brads complete the finished design..


I'm using my book box to store inchies i'm creating for a 365 days of inchies challenge and I'm keeping my fingers crossed that It will hold all 365 of them by the end of the year..

Thank you for stopping by, wishing you all a super weekend.

Hugs Tracey xx

Creative Recipe:
Graphic 45 Book Box
5x7 Canvas Board
Paperbabe MayLeeDee Clear Stamp
Paperbabe Oriental Zen Clear Stamps
Stamps Away Embossing Powder
Pebeo Gilding Wax *King Gold*
Spectrum Noir Illustrator Pens

Pebeo Black Gesso
Pebeo Gold Paint
Modelling Paste
Mod Podge

Monday, 6 February 2017

February Tag... for Luck or Love

February Tag
Using the 12 mini prompt/instructions here is my second tag of 2017.


Size 14.5cm x 7.cm Tando Creative tag
1: Covered in black gesso with 1 coat of DecoArt Americana Tuscan Red acrylic paint
2: Black acrylic paint rollered on
3: IndigoBlu Super Thick slap it on pressed through a 6x6 TCW Love & Peace Stencil


4: Fabric & fibre collage added
5: A layer of DecoArt white translucent paint
6: DecoArt Gold acrylic dripped down the tag.


7: Stencil layer added at bottom of tag (white)
8: Covering of clear gesso
9: Stamped origami boat from Paperbabe Oriental Zen Stamp Set


10: Focal image.. Paperbabe MayLeeDee Kimono stamped & coloured using Spectrum Noir Illustrator pens, an alternative silk head scarf has been created instead of just hair.
11: Doodles & highlights using Posca marker pens
12: Tim Holtz.. Words grateful heart


The tag is finished with hand stamped & complimenting coloured ribbon.

Thank you for sharing your time, wishing you all a creative week.

Hugs from Tracey xx

Tuesday, 24 January 2017

Frosty Robin

Regrettably I never got chance to use this delightful stamp before Christmas, whilst having a top and tail of some of my stamp collection I thought I would test stamp the Robin from IndigoBlu and just couldn't resist creating a little hanging plaque.


I painted a 6x6" greyboard with white gesso then Grandma's Teacup acrylic by IndigoBlu, whilst the paint was still wet I removed some of the paint using a sponge exposing the white gesso.


Using versafine black onyx I stamped the Bare Forest Stamp various times using a mask to 
help resist some of the ink transferring onto the board.


Using an oral syringe filled with IndigoBlu Super Thick Slap I followed the stamped branches by pushing the slap it on through the syringe giving a thin raised appearance.


Sprinkling with unicorn sparkles this really gives the look of frosty branches.


The robin has been stamped, embossed and painted with Postbox Red & Hot Cocca, posca pens have been used to add finer detail with the finished image being fussy cut. I decided to cut the fruit off my design as it did not go with what I was hoping to achieve.


Onto the board The Robin along with red gems have been randomly adhered to represent berries, adding a spot of white gesso to each berry blends them nicely into the picture.


I edged the board using clear embossing pen and white embossing powder.
The word freedom is from IndigoBlu's Plume stamp set stamped and embossed onto paper also  painted in the Grandma's Teacup. 


As I stated earlier this really is a delightful stamp and i'm already thinking of ways to use it..

I'd like to enter this in the Rubber Dance Stamp Challenge - January Blue-Red-White

Thank you for sharing your time to take a peek.. 
Creative Hugs from Tracey xxx