Pages

Friday 31 August 2018

Paperbabe Picture inspiration #81 ~ Pebble Cairns

Hello Creative Friends.

It's time for another challenge over at Paperbabe Stamps
and this fortnight we are asking you to use the picture to
inspire your creativity and share it with us over HERE.

Beach Pebble stacking is a mindful activity which requires patience and focus.
Harmless to the environment as nature reclaims them when the tide comes to call.


I've used the calmness of the colours from the stack to create a doodle
book and introduce elements upon it to represent part of the image.

Here's those *How to Do's*...

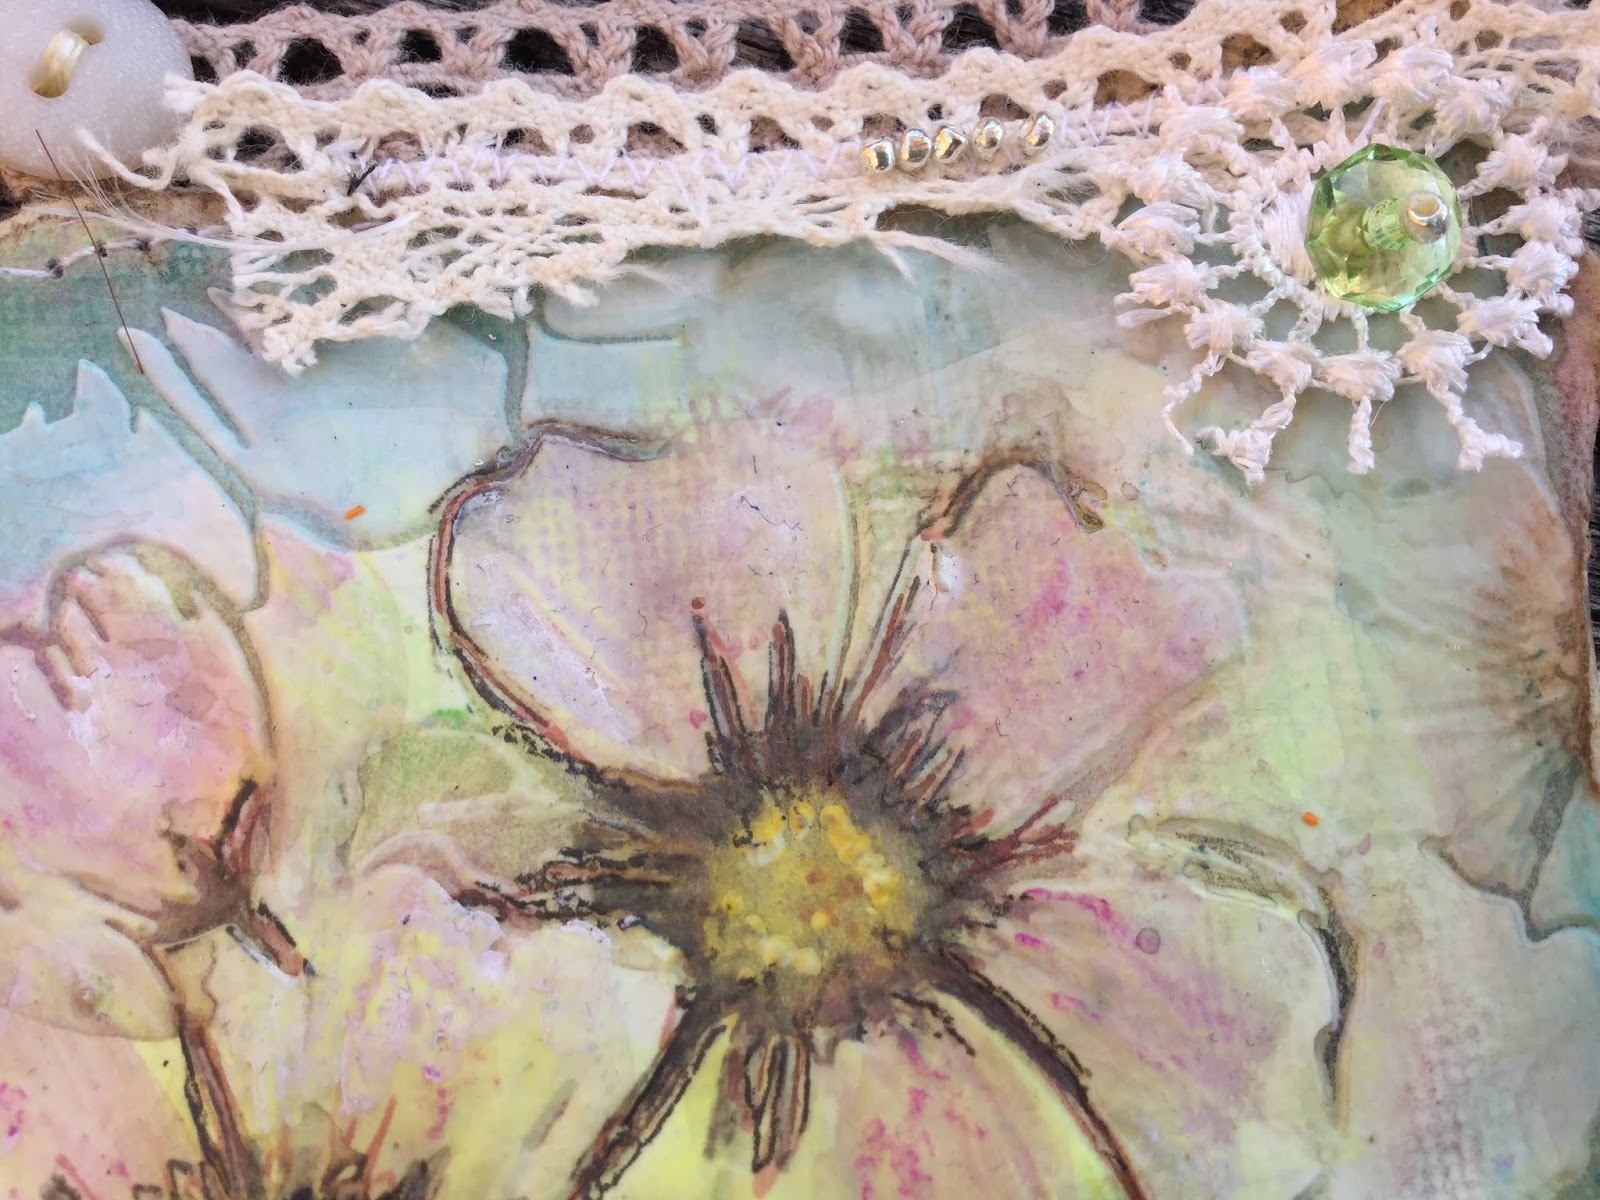
Onto an A4 piece of Kraft Card I have layered calico and lace,
sewn into place and painted over colour using distress crayons.


From the *Like Clockwork* set I stamped the face and numbers,
The numbers fit perfectly inside the minute marker stamp.


With the Isometric stamp printed onto the calico back cover I secured
it onto the Kraft card with stitching and used Paperbabe leftovers from
previous creations to embellish, including stamped rice paper and tea bags.


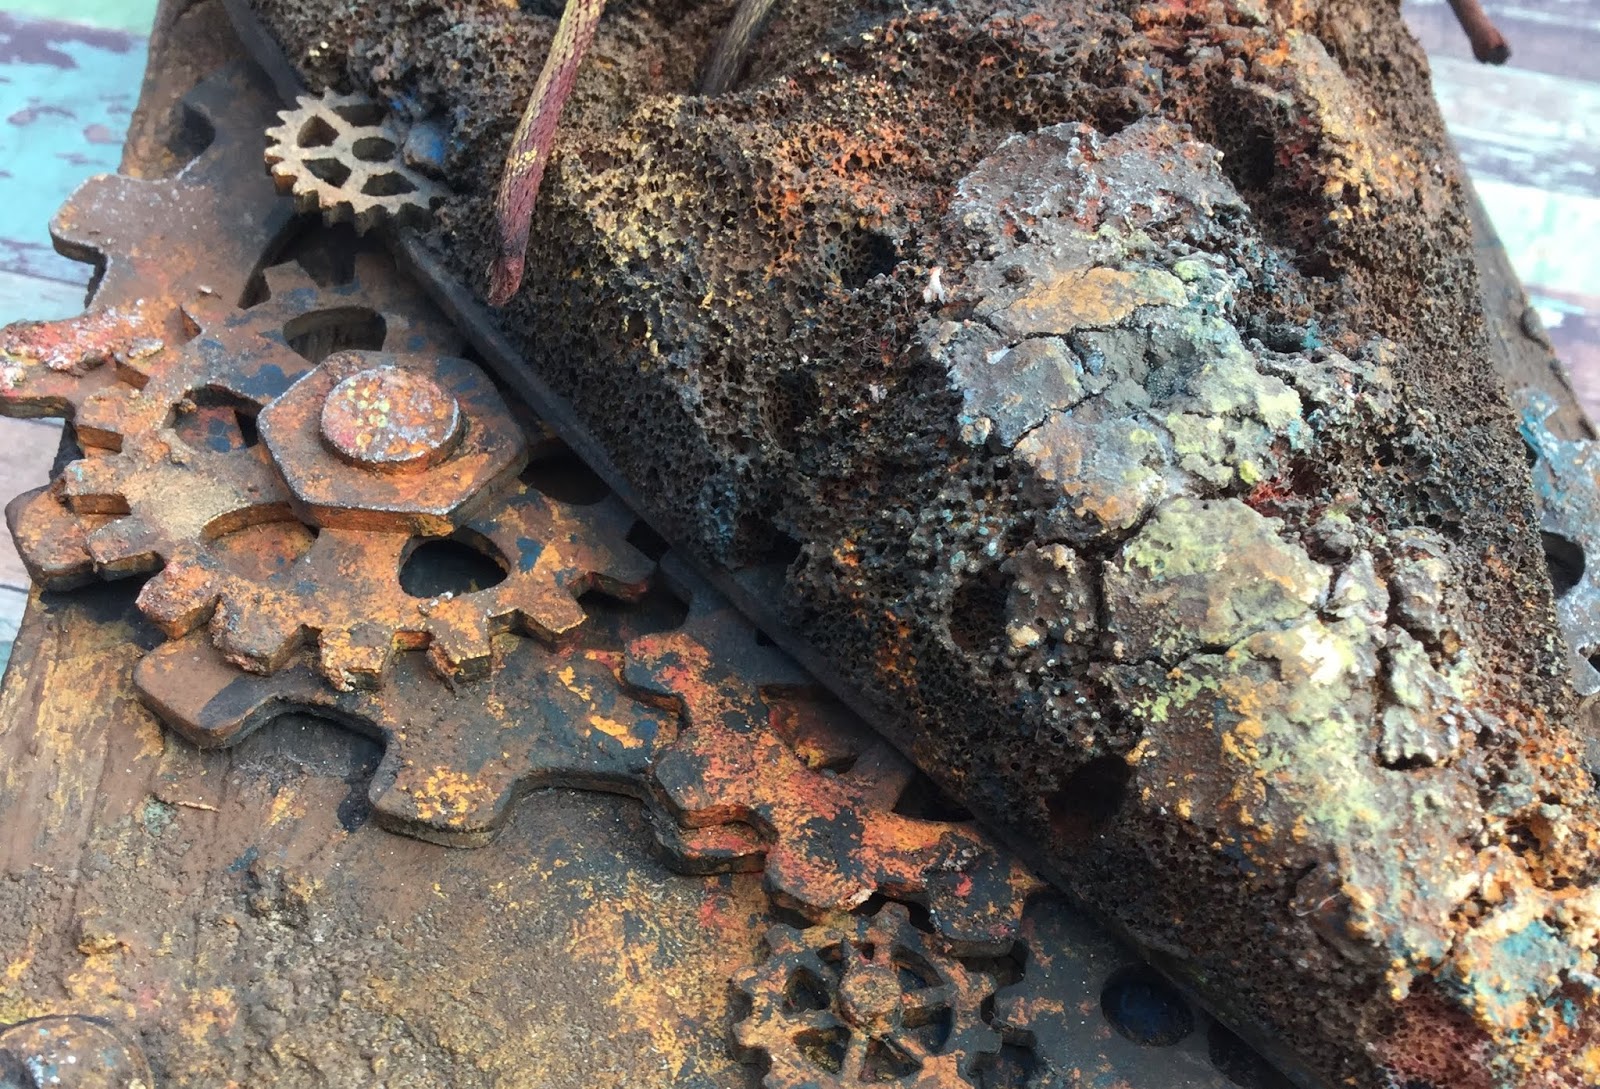
With the Kraft Card clock face trimmed and sewn in place the cogs 
and gears are the perfect fit to stamp onto the MDF buttons. 


The words Inspire me have been stamped onto a used Teabag smeared in 
gesso and glued onto the front of the cover along with the pointing hand 
stamp included within the *Like Clockwork* set. 


Stamped onto rice paper the word because has been adhered to the back..
BECAUSE we do not need to have a reason to be creative do we.. ?
A blank canvas to add more, scrawl or paint upon.


Filled with a selection of papers tied in with string the ability to express is unlimited.
Watercolour, drawing, stamp, Kraft and black core card have all been included.
I've used the isometric stamp as a guide for some mindful colouring.


A Cogs stack to resemble those Cairn Pebbles completes my 
Mixed Media Paperbabe Doodle Book..


I'm using this as my calming space, something much needed at the moment,
with the hope of keeping everything within it monochrome or neutral.

Thank you for sharing your time, it surely is precious.
I hope you too can join in and share your take on the Picture challenge.

Creative Hugs & Wishes
Tracey xx

I'm joining in with the PPF Fun today with Kristin & Eva.

 Paperbabe Stamps Creative Supplies: 

Paperbabe Portrait Media Blanks

Wednesday 29 August 2018

WOYWW #482

Happy WOYWW everyone

I was away last week so missed out on my woyww fix..
It's surprising how addictive it has become each week catching up with everyone
and their Wednesday workspace courtesy of our host Julia at the Stamping Ground.

No creative work area shot for me and there may not be any for a week or two
as I'm currently boxing everything and I mean EVERYTHING
away in my kitchen as it's due a long awaited face lift next week.

This is a tiny selection of boxes I need to find a temporary home for,
there seems to be more craft equipment than kitchen...!


I have to say i'm not looking forward to the next couple of weeks and will be glad
when it's all completed and I can start to get back to normal if that's at all possible.

One creative thing I can share is the contents of my scrawlr box this month.
Think I will be making good use of this one over the next week or so
as I may not be able to find much else hee hee!!


Looking forward to visiting you all 
as soon as I can find my way out of the kitchen.

Creative Hugs

Tracey xx

Tuesday 21 August 2018

Look beyond the Rust and Crust of Life

Hello Creative Friends

I hope you are all keeping well and those of you in the UK
are looking forward to the upcoming Bank Holiday..??

I've been having a BIG craft sort out and came across more UFO's
I knew these elements would work very well together.

Here's what I got up to and those *How to Do's*

Take a cheap household sponge and glue it onto a greyboard heart.
Shape to size, punch in holes and add eyelets when dry.


Onto an MDF Chunkie I pushed texture paste through the Lines Stencil
Smeared on sand paste with my fingers and when dry painted 
all over with Chestnut Brown Multi Surface Paints.


I then dabbed on paint from the colour choice you see, spritzing with water 
allowing the paints to drip, fall and catch on the textured surface.


The sponge heart was first painted in red, spraying with water 
makes it easier for the sponge to absorb the paint. When dry 
I dabbed on spots of texture paste and allowed it to dry completely.

Using a bag full of greyboard cogs already prepped as a colour guide.

I used that same colour palette seen above to paint the whole heart 
mixing the colours on the sponge to replicate the colour of rust.


Arranging the cogs onto the chunkie I threaded a lace through 
the heart gluing it all in place using multi purpose adhesive.


Adding the finer detail to create the rust effect background,
pushing and pinching the texture paste allows it to crack


Picking away pieces of the texture paste also removes parts of the sponge 
revealing those protected rich reds underneath as the paste acts as a resist.


Stamped words on Kraft card are distressed and concertinaed 


Glued into place my Rust effect chunkie is complete and ready to hang.


Wishing you all a fabulous week ahead
what ever you have planned.

Take Care & Stay Safe

Creative Hugs & Wishes
Tracey xx

I'm playing along with:
SanDee & amelie's - Steampunk/Industrial Challenge
A Vintage Journey - How can I resist Challenge


All products  used are That's Crafty:
Greyboard heart - MDF ChunkieLines Stencil - Multi Surface Paints - Texture Paste -
Texture Sand Paste - Greyboard  Small Cogs Large CogsMultipurpose Adhesive

Friday 17 August 2018

Paperbabe #80 Anything Goes *Friendship*

Happy Friday everyone

It's time for another challenge over at Paperbabe Stamps 
with the favourite theme of many *Anything Goes*

Please pop over HERE and share your creativity with us,
you do not have to use Paperbabe stamps but if you do 
the prize will increase for one lucky winner.

Here's what I got up to and how it came to be..

Sometimes the hardest part when creating can be having no instruction.
Anything goes gives us freedom to explore and words often help me do this.

The line below is taken from the Poem Youth and Age by Samuel Taylor Coleridge 
and is included in the Tree Hugs Stamp set and is my own source
of inspiration for this journal page.

.

Using one of my Paperbabe WIP's created using the mini portrait templates, 
stamped facial features and blunt bangs she awaits further adaptation.


Onto a journal page I created a scene using the Tree Hugs Stamp set.
scribbling in areas of light and shade using neocolor II's.


Deli paper applied with matt medium helps add texture to that flat page.


Acrylics are painted over the Deli paper and spritzed with water to move the paint 
around, repeating the process when dry until happy with the application.


What appears to be birds in the sky is actually two hands holding.
A genius little stamp included in the set.


After adding more colour to the tree tops I stamped in those two nesting birds 
and rounded off the area of light surrounding to form the Sun or Moon 
which every you choose to see. 


Luminance pencils help create a Unicorn effect to the hair colour.


Cut out and applied to the page, black pencil is used heavily to outline each area.

My Paperbabe Journal Page is complete.


Friendship is such a beautiful thing and we are blessed if we have 
friends that we can count on during our life time... I know I do..

Wishing you a wonderful week
and much creativity.

Hugs Tracey xx

I'm sharing this with Bluebeard and Elizabeth over at AJJ Count your blessings
Craft Stamper Magazine: August Anything Goes


Paperbabe Supplies:

Paperbabe Portrait Templates: Mini Female Head & Torso & Blunt Bangs
Paperbabe Stamps: Tree Hugs set 

Wednesday 15 August 2018

WOYWW #480

WOYWW #480

As if by magic another Wednesday appears and it's time to share what's on our
workspace and peep at other's courtesy of Julia over at her stamping ground.

There's not been much creativity on this space
in fact it's hardly changed over the past few weeks.

That's all set to change in a week or two
and surely upset the Craft Cart..


Here's a glance of the quickest Anniversary card I've ever made 
using some super thick mirror card, staZon & a ball tool. 

Funny that Claritystamp are celebrating their 25th year too.

Sweet, symbolic and nothing Beer related on this one.
Just need to add some soppy words now awww...

Thank you for all the early Anniversary wishes, it's officially tomorrow xx


After the silliest of things that caused chaos last week I can report that some
have been fixed, some still waiting to be fixed and others totally unfixable.

Non the less after my washing machine stopped mid wash and started flashing
FO5 at me I wasn't sure whether this was an insult or indication it had just had enough..
Google sure was my friend that day (other search engines are readily accessible)
 as it taught me how to empty, unblock & resume that wash...

There is light at the end of that wash basket after all.
I'll keep you all posted on the craft cart..

Look forward to seeing WOYWW #480

Creative Wishes
Tracey xx

Friday 10 August 2018

Count your blessings...Together.

Happy Friday everyone..

I've not had much time for creativity this past week but managed 
to snatch a couple of hours today to complete this journal page.

Bleubeard and Elizabeth are our hosts over at Art Journal Journey
with this months theme being *Count your Blessings*

This found journal page full of paste, stencils & DOx's made the perfect backdrop.


Hubby & I will be celebrating our 25th Wedding Anniversary next week and 
ALL these stencilled words remind me how blessed I am that we are still *Together*
 After meeting nearly 30 years ago we can still be as silly, weird or wierd 
as the stencil states just like those early days... it's extraordinary!


Here's what I got up too..

Onto Linen paper I pushed modelling paste through an AALL & Create 
stencil. I find this paste leaves a fantastic flexible surface to work on. 

Torn around the edges I painted over the page with a thin layer of Gesso 
and used watercolour pencils to layer up those flower colours.


When happy with the colour blend I've sewn on some 
lace remnants along with a handful of beads.


These two hearts are from That's Crafty left over from a past project.
Coloured to mimic the colours within the page I let the lace overlap 
adding a little key & button embellishment.


The initials J & T gave it that personal touch...


With the embellished panel glued to the page Distress crayons 
are used to blend in extra colour completing my Journal page.

The colours of these flowers just remind me of my 
Summertime Wedding Bouquet. 


Thank you for stopping by..
It's been a very eventful week for me,

I'm looking forward to having some down time and
catching up with you all over the weekend.

Creative Wishes

Tracey xx

I'm linking up with:
Kristin & Eva over at PPF
Moo-Mania & More Summertime Challenge
Thank you all for hosting

Wednesday 8 August 2018

WOYWW 479

Happy WOYWW #479 everyone..

Time to share and stare at whats on everyone's workspace 
courtesy of Julia our host over at the stamping ground.

I've had one of those weeks where nothing has gone to plan 
and everything I seem to touch has broken. 

*Toilet stopped Flushing*
*Radiator randomly turns itself on.. Glory be in this HEAT!!*
*Kitchen Cupboard door fell off it's hinges*
*Kitchen draw fell apart*
*Dropped a whole pot of fibre paste.. not a pretty site*
There's more but I won't bore or depress you..

So this picture was taken last night where I escaped into the garden to have a 
moment of me time prepping some journal pages and cleaning paint brushes.
Enjoying the cool evening air...


I'm so lucky to have received this wonderful bundle from my dear friend 
Dorthe last week and delighted to be able to share it with you all.

Agnes is a Beach Angel handmade by Dorthe, with her pretty cotton lace petticoat 
made from a napkin from the USA she carries discovered driftwood from the coastline.

Watch parts from a watch maker tied up with a driftwood peg and a beautiful stitched tag.
The paper wrap contains a skeleton leaf which I was too scared to unwrap and show you 
just incase it blew away with the strong winds of last night.


Look at her sweet hand painted face, isn't she just adorable.
She warms my heart and brings a smile every time I look at her.

Thank you for allowing me to share this delightful bundle Dear Dorthe
and hugs for these sent treasures...xx


and finally here is a couple of photographs captured over the weekend.

I was unsure if the Bee's were making use of these Beer bottle caps full of sugar water
as the ones at the bottom of the garden seem to be full of ants each morning 
when I go to refill them..


...but obviously this little Bee has stopped off for evening Tea 
after a busy day bumbling around in the heat all day.


Feel like I could do with an energy drink myself after the last week.

I'll be around to visit asap as i'm at home today, still boxing and labelling
whilst waiting for the repair man to arrive.

Look forward to seeing what you've all been up to.
Hugs & Creative Wishes
Tracey xx

Friday 3 August 2018

Paperbabe #79 Sketch Challenge

Hello Creative Friends

It's Friday Yayyyyy... 
..weekend i'm so looking forward to you after the busiest of weeks..!

It's time for another Challenge at Paperbabe Stamps.

This fortnight we are asking you to use the sketch below and be inspired.
The "Paperbabe stamps" can represent any sentiment.
Use the shapes as prompts, flip, turn and create your own design. 

There's a prize to be won for one random winner.


Here's what I got up to using the Sketch, along with those How to Do's.

Drawing around the Portrait Head and Torso Template I used the markings 
on the template to guide and help me to stamp those Doll Face features 
exactly where they needed to go.


Water-soluble and permanent pencil are used to colour my Paperbabe
with her hair line drawn free hand. Die cutting out her face will form 
the large circle from the sketch prompt.


With the die cut portrait mounted on to a larger die cut circle
this will hide the hole it has left when remounted over the aperture.

Two strips of paper are decorated in gems and left over lace 
to represent part of the sketch prompt..


With the *Your Sparkle* sentiment stamped boldly into the corner of the 
postcard it was time to layer all those sketch elements up and display them 
on to a lace, gesso'd and crackle glaze white space Journal page.

...but I think I need to stitch and distress the edge of that postcard first..!


The portrait design on the white mount area is continued to hide it.


Not happy with the colour match of her neck on the layered circle due 
to using a different cut of card (Silly me..) I decided the best thing to do 
was hide it and give her a Vintage style choker necklace.


With the Sketch piece glued onto the journal page I extended
the line and colour of the hair letting it flow from postcard to page.

The natural lace grips hold and absorbs the colour yet upon the simplicity of the
white gesso resists the watercolour almost washing it away from the background.


My Paperbabe Sketch is complete.

I love how the white space envelops her..


Thank you so much for popping on by..
I look forward to seeing your interpretations over HERE.

Wishing you all a wonderful weekend.

Take Care & Stay Creative
Tracey xx

Creative Supplies:

Paperbabe ~ Mini Head and Torso Mixed Media Portrait Templates, 
Paperbabe ~ Your Sparkle stamp
Water colour paper/card
Water soluble/permanent Pencil
Lace, Gesso and Crackle Glaze
Waterbrush/A4 Journal

I'm linking up with Eva & Kristin and joining in with the PPF
and
A Vintage Journey *How can I resist*