Pages

Showing posts with label Indigoblu acrylic paint.. Show all posts

Friday, 17 August 2018

Paperbabe #80 Anything Goes *Friendship*

Happy Friday everyone

It's time for another challenge over at Paperbabe Stamps 
with the favourite theme of many *Anything Goes*

Please pop over HERE and share your creativity with us,
you do not have to use Paperbabe stamps but if you do 
the prize will increase for one lucky winner.

Here's what I got up to and how it came to be..

Sometimes the hardest part when creating can be having no instruction.
Anything goes gives us freedom to explore and words often help me do this.

The line below is taken from the Poem Youth and Age by Samuel Taylor Coleridge 
and is included in the Tree Hugs Stamp set and is my own source
of inspiration for this journal page.

.

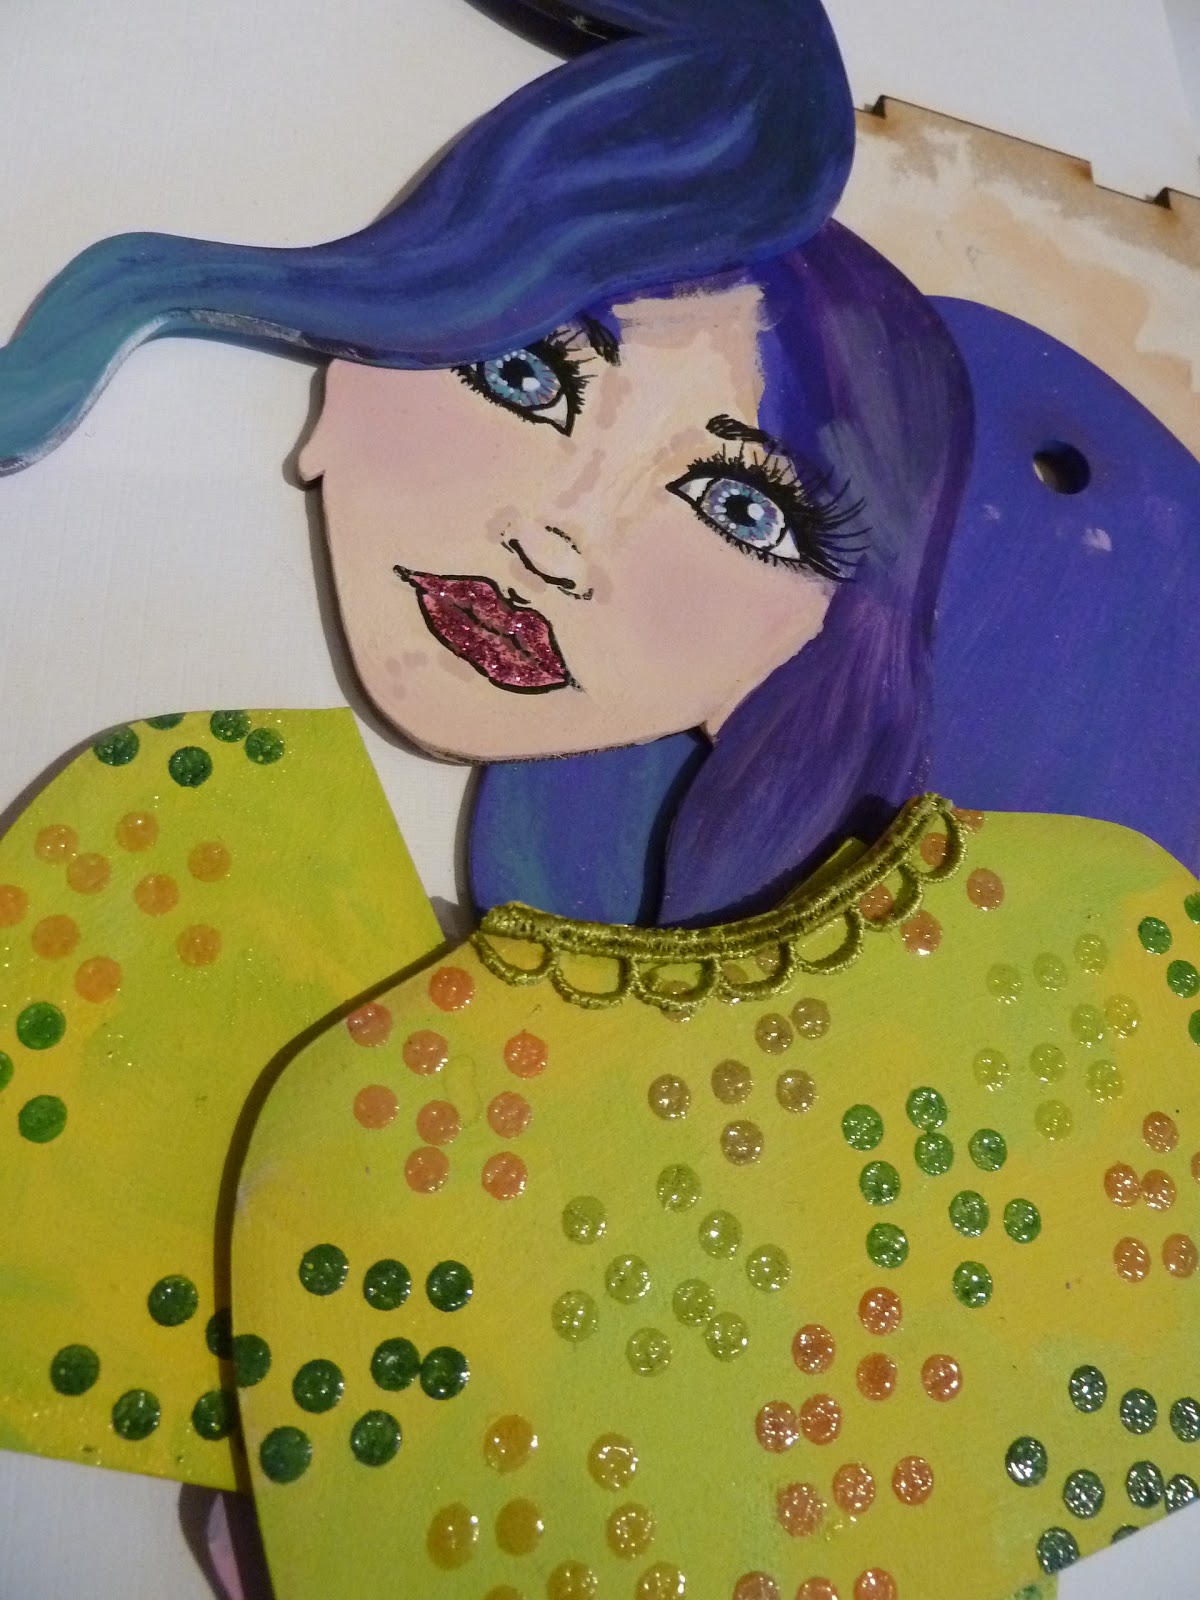
Using one of my Paperbabe WIP's created using the mini portrait templates, 
stamped facial features and blunt bangs she awaits further adaptation.


Onto a journal page I created a scene using the Tree Hugs Stamp set.
scribbling in areas of light and shade using neocolor II's.


Deli paper applied with matt medium helps add texture to that flat page.


Acrylics are painted over the Deli paper and spritzed with water to move the paint 
around, repeating the process when dry until happy with the application.


What appears to be birds in the sky is actually two hands holding.
A genius little stamp included in the set.


After adding more colour to the tree tops I stamped in those two nesting birds 
and rounded off the area of light surrounding to form the Sun or Moon 
which every you choose to see. 


Luminance pencils help create a Unicorn effect to the hair colour.


Cut out and applied to the page, black pencil is used heavily to outline each area.

My Paperbabe Journal Page is complete.


Friendship is such a beautiful thing and we are blessed if we have 
friends that we can count on during our life time... I know I do..

Wishing you a wonderful week
and much creativity.

Hugs Tracey xx

I'm sharing this with Bluebeard and Elizabeth over at AJJ Count your blessings
Craft Stamper Magazine: August Anything Goes


Paperbabe Supplies:

Paperbabe Portrait Templates: Mini Female Head & Torso & Blunt Bangs
Paperbabe Stamps: Tree Hugs set 

Tuesday, 31 October 2017

DOTD.. *Quintessential Soulmates*

Hello creative friends..

What a creative weekend I have had and to be honest I'm not sure how I have managed to create anything. Between finishing personal projects, DT work and starting the Christmas card making frenzy it has been utter chaos trying to find the space to dry things.

This is how I have been working this weekend, anything finished from main project to the tiniest element has been bagged up for fear of losing components amongst the mayhem.

I would have shown you a picture of the disorder around me but 
I lost my camera under it all..!!

Here's pictures and process of my DOTD Mrs & Mrs Paperbabe..

Two bags full of  Fibreboard substrates painted, coloured and glittered
using one Kit and the other from Paperbabe components put together to create another.


Here they are unearthed from their bag, ready to be assembled.


So let me introduce the Lady before Gentlemen:

Using Paperbabe stamps included in the DOTD kit I stamped her features and decorative details using Onyx Black Versafine ink and coloured with paint, pencil and posca pens.


Extending the stamped detail down her neck I just had to add a little spider friend.
Pushing embossing ink through the rose stencil I embossed the flowers with frantage.

The flourishes have been embossed with frantage embossing powder too.


Some of the fibreboard roses included in the kit can be built up to create a 3D bloom.
These have been painted and glittered and look so effective when mounted.

Dots of pen and dabs of glitter glue give definition to her Gesso painted hair.


I heat embossed the edges of the large ornate frame (also included in the Kit) 
using aged black frantage a perfect frame to showcase all those detailed elements 
once glued down upon it.

Mrs Paperbabe is now Complete and ready to mount onto the wall.


..and finally. Introducing Mr Paperbabe.

From the Mens Portrait set I painting his face and stamped using the Male Face  and sugar skull stamp set included in the Kit. I coloured, painted and clear embossed his features and adornment..


Extending the stamped detail again onto his neck I chose to mimic the spiders web just like Mrs Paperbabe. I sketched a suit onto the fibreboard clothing pieces and hand drew 
little skulls onto his bow tie with posca pens to match those two sweet skull 
embellishments that I'd heat embossed in white.


Another little spider friends adds to the detail..


Mounted onto an ornate frame heat embossed in the same way as Mrs Paperbabe
those completed elements are all glue together to set the scene.

Now Mr Paperbabe is complete..


Don't the make a handsome couple..???

*Quintessential Soulmates*


Thank you for sharing your time, I hope you like what you find.

Until next time
Stay safe everyone & Take care

Hugs & Wishes
Tracey xx

I'd like to enter this into the Paperbabe Stamps Challenge #59~Scare Me

Sunday, 29 October 2017

October Tag: Carving Time.

 Halloween it's a small step away but i'm sure many of you who celebrate will have Fancy dress party's this weekend if not already attended. Judging by the amount of fireworks around here I think my neighbours are all partied out now.

On that note i'm sharing my October Tag: Carving Time using those same prompts that
i've been bringing to you each month with the courtesy of Chris.

Here is my October Tag: Carving Time 

Covering a Tando long tag in black gesso I painted over it with Burning Bonfire
IndigoBlu paint. When dry I dragged Yellow Meringue paint across the top.
Clear 3D gloss has been pushed through a tree stencil from imagination crafts.


Short threads from my scrap stash have been applied using matt medium.
A layer of Orange Shimmer paint was painted on top with Antique Gold 
Multi Surface paint flicked on to the dry surface. 


Using the same Tree stencil I applied Black Gesso through it and covered in a coating of clear Gesso. As you may be able to see because the Black Gesso was not quite dry and it smudged the tree's but I do think it adds a little atmosphere.

Birds from Rubber Dance were stamped with archival ink.


The sweet pumpkin image was sent to me by Pat (Thank You)
and perfect for this tag. Glued to the tag I added some doodles with a Posca pen 
and enhanced the darker areas of the pumpkins with a black Biro pushing a little 
harder than normal to created an impression. 

Distress glitter and gems help to enhance the pumpkins with the Tim Holtz words 
*Carving Time * adding a sinister twist to my finished Tag.


Colour coordinating Ribbon, cord and orange beads completes my October Tag..


Apologies for the last photograph as it doesn't do those wee pumpkins justice 
but I seem to have mislaid my camera under the frenzy of my Christmas card making.

Enjoy your Sunday everyone.

Warm Hugs & Creativity
Tracey xx

Wednesday, 27 September 2017

September Tag: Let's sleep...

Hello everyone, I seem to be cutting it very fine with these monthly Tags
it seems that as soon as the month arrives it fades just as quickly.

Today i'm sharing tag number #9 using the same prompts used
 each month for those of you that may have been following.


Here in words and pictures is my September Tag:

Covered in a coat of clear gesso, leather corset and warm tan acrylic paint,
modelling paste has been pushed through the Big Floral Stencil.


Paper feathers have been added as collage and coated in matt medium,
Pearl shimmer paint is painted all over and Gold paint allowed to drip down the Tag.

Black Soot Distress Oxide has added more detail rubbed through the Faded dots stencil.
A gentle application of clear Gesso seals most of the design without moving it too much.


Stamps from Card-io's blown away set are stamped on using Archival leaf green.

I found a very Quirky Owl image in a free papers booklet from 
Making Cards February 2017 edition, the same place I found the feathers.

Cut out I adhered the Owl to the bottom of the tag as I wanted 
to keep some of the Big Floral stencil visible.


A few doodles bring out the details on the feathers, a found sentiment from Tim Holtz Chit Chat book *Let's sleep under the stars*, along with some fibres and a gem or two..

 The final touches are ready to be added.


With the addition of glossy accent eyes
My September Tag is now complete:


Can't believe I managed to complete this without even a hint of gilding wax!!
Only three more to go until my full year's worth is complete.

Thank you for sticking around everyone.

Wishing you all warm hugs and lots of creativity.
Tracey xx

Tuesday, 11 July 2017

Paperbabe Butterfly Girl..

Well the picture inspiration over on Paperbabes Blog Challenge is simply delicious so I busied myself looking for fruity colours amongst my shamefully large paint collection. 

Think these will do to start with...!!


The Paperbabe portrait substrates kit is full of different shaped elements that you layer up to build a painted portrait in 3D. Here is words and pictures is my Paperbabe Butterfly Girl.


I painted the face and neck using IndigoBlus Junk and Disorderly  portrait colour paints. I have to say I've been mixing my own skin tones for many many years now but the new indigoblu ones are fabulous!! The hair substrates have been given the Ombre effect.


The Paperbabe facial features have been stamped on roughly, they can be tidied up later when adding the fine details. The hairline has been painted on just to give me a guideline of where the hair piece will go.


In the kit you get substrates that resemble garments for both front and back which come in a V and round neck shape, it's your choice how you display them. I painted these panels with a mixture of zesty colours, stamped a spotty stamp from the paperbabe Whimiscal Woodland Owl set using memento inks, embossed them and edged them with lace trim. 

The eyes have been tidied using Posca Markers and glitter added to those Luscious Lips.

Time to piece it all together with a touch of glue:


As she has so much hair I thought it was such a shame to leave it so flat looking. It was a great space to work on and add more elements so I found some mixed media Butterfly blanks in my crafty stash and painted them using some of those sort out colours. 
I finally added a little wire and beads for extra detail to the more prominent ones.

This is the finished front...


and this is the back.


I chose to use the base on mine, following the colours used on the garment and have it free standing but the kit does come with the ability for you to hang this up, the hole to this one is hiding under the large Butterfly.

Thank you for visiting and taking the time to check out my Paperbabe Butterfly Girl.
Wishing you all a wonderful week, take care & stay safe.

Creative Hugs 
Tracey xx

I'd like to enter this into the Paperbabe Challenge #51 Picture Inspiration

Crafty Supplies:

Portrait Media Substrates - Wavy Central Parting Kit
Paperbabe mini Female Face stamps
Mixed Media Blanks - Accessories Kit
IndigoBlu Junk and Disorderly Portrait Paints
Black Archival ink for facial features/Memento for dots.
Paperbabe Whimsical Woodland - Set 2 (Owl) for dots stamp
Lots of brightly coloured paint (from my paint mountain!)
and a touch of Lace, Wire and Beads ..
Not forgetting some glitter for those luscious lips.. :))

Friday, 21 April 2017

April Tag.. bitesized.

Can't believe we are nearly one third of the way through the year and i'm here today sharing my April tag following the 12 week Tag challenge instructions.


Here are those how to do's in words and pictures..

I painted a 35 mm  x 70 mm Tando- Creative size 1 Tag in White Gesso
then a layer of IndigoBlu Lime Marmalade.
Covered with IndigoBlu Stroke of Midnight making
squiggly marks whilst the paint was still wet.


I Pressed Decoart Modelling paste through a TCW Stencil, added Lace for Collage
and covered in a layer of DecoArt Transparent Yellow Oxide


Dripped Lime Marmalade paint over the tag and sealed with matte medium when dry.


As this tag is small I thought it would be so quick to follow and administer
all the instructions from the 12 week challenge but how wrong I was.

I realised that it would be an art form in itself to deliver each instruction as my focal image would cover most of the tag up. I decided to forfeit any stamping on the tag as my focal image is stamped using Rubber Dance Textured Flowers stamps.


Doodles have been added to the focal image, wired embellishments, words of wisdom 
and a bulldog clip gives this mini tag a little more height. 
As you can see from the penny beside it the tag is quite small.


This tag now has some magnetic sticky strip added to the back
making a rather nice fridge magnet.

Thank you for popping on over. Have a great weekend and I look forward to sharing some more creativity with you very soon.

Hugs Tracey xx

Crafting Supplies:

Size 1 Tando Creative Tag 
IndigoBlu Lime Marmalade
IndigoBlu Stroke of Midnight
TCW Mini Texturized Stencil
DecoArt Modelling Paste
DecoArt Transparent Yellow Oxide
DecoArt Matte Medium
Rubber Dance Stamps
Rubber Dance Textured Flowers Stamps UK

Sunday, 12 March 2017

On the cusp of Spring..

As time plays a big factor in March and we lose an hour with BST its an early reminder that the lighter nights will soon be upon us along with awakening nature and floral beauty.

Today I'd like to share a project I finished a good few weeks ago..


Using a plywood painters palette I first coated it in white Gesso.
Mixing Pink Iced Gem acrylic paint with IndigoBlu Super thick slap it on I used the
Girl in Profile stencil as a guide to create the face profile.


Versamark embossing ink has been stamped through the Laurel Leaves Stencil with Luscious pigment powders Gold, Bronze and Penny Dreadful gently dusted on top.


Images are stamped from both A5 IndigoBlu Live Laugh Love and 
the Blooming Great stamp sets.


By adding drops of water to a small amount of decanted Luscious pigment powder the stamped images have been painted using Coral, Raspberry, Gold, Buttercup, Lawn, and Purple. They have then been cut out and scrunched up to give a worn look.


A hole has been measured and punched into the palette ready for the clock fitting and a layer of white Gesso applied over the whole image to make it sink into the background.
Super Thick Slap it on was then been pushed through the Small Clock Face Stencil.


As Super thick Slap it on dries clear Gilding wax has been used to highlight the clock face. The small flowers from the Blooming Great stamp set have been placed on the
3rd, 6th, 9th & 12th Hour making it easier to read the time from afar.


Butterflies and Dragonflies have been randomly stamped onto the palette from the
Live Laugh Love stamp set and Painted with Rose, Poseidon Blue and Lawn Luscious pigment powders before assembling the clock mechanism.


The scrunched and cut flowers and leaves have been applied after the clock mechanism was fitted as I could then see the surrounding space and make sure both flowers and leaves did not interfere with the clock hands as they moved around.


I'd been waiting for the right project to come along to be able to use this paint palette 
and I must say the image created seems to fit perfectly. 

Thank you for your time, I hope you have been inspired.

Creative Hugs from Tracey xx