Pages

Showing posts with label Posca Marker Pens. Show all posts

Tuesday, 31 October 2017

DOTD.. *Quintessential Soulmates*

Hello creative friends..

What a creative weekend I have had and to be honest I'm not sure how I have managed to create anything. Between finishing personal projects, DT work and starting the Christmas card making frenzy it has been utter chaos trying to find the space to dry things.

This is how I have been working this weekend, anything finished from main project to the tiniest element has been bagged up for fear of losing components amongst the mayhem.

I would have shown you a picture of the disorder around me but 
I lost my camera under it all..!!

Here's pictures and process of my DOTD Mrs & Mrs Paperbabe..

Two bags full of  Fibreboard substrates painted, coloured and glittered
using one Kit and the other from Paperbabe components put together to create another.


Here they are unearthed from their bag, ready to be assembled.


So let me introduce the Lady before Gentlemen:

Using Paperbabe stamps included in the DOTD kit I stamped her features and decorative details using Onyx Black Versafine ink and coloured with paint, pencil and posca pens.


Extending the stamped detail down her neck I just had to add a little spider friend.
Pushing embossing ink through the rose stencil I embossed the flowers with frantage.

The flourishes have been embossed with frantage embossing powder too.


Some of the fibreboard roses included in the kit can be built up to create a 3D bloom.
These have been painted and glittered and look so effective when mounted.

Dots of pen and dabs of glitter glue give definition to her Gesso painted hair.


I heat embossed the edges of the large ornate frame (also included in the Kit) 
using aged black frantage a perfect frame to showcase all those detailed elements 
once glued down upon it.

Mrs Paperbabe is now Complete and ready to mount onto the wall.


..and finally. Introducing Mr Paperbabe.

From the Mens Portrait set I painting his face and stamped using the Male Face  and sugar skull stamp set included in the Kit. I coloured, painted and clear embossed his features and adornment..


Extending the stamped detail again onto his neck I chose to mimic the spiders web just like Mrs Paperbabe. I sketched a suit onto the fibreboard clothing pieces and hand drew 
little skulls onto his bow tie with posca pens to match those two sweet skull 
embellishments that I'd heat embossed in white.


Another little spider friends adds to the detail..


Mounted onto an ornate frame heat embossed in the same way as Mrs Paperbabe
those completed elements are all glue together to set the scene.

Now Mr Paperbabe is complete..


Don't the make a handsome couple..???

*Quintessential Soulmates*


Thank you for sharing your time, I hope you like what you find.

Until next time
Stay safe everyone & Take care

Hugs & Wishes
Tracey xx

I'd like to enter this into the Paperbabe Stamps Challenge #59~Scare Me

Friday, 25 August 2017

August Tag.. Thank you *SEW* much ..

Hello creative Friends, today i'm sharing Augusts Tag using those 12 weeks of prompts.
Tag No:8 oh gosh not many more left before I complete my personal challenge
of creating a different one each month using those very same prompts.

 This post is a scheduled one as I will be away and probably not have much time 
when I return to create or post before September sneaks in.

This tag is created using some goodies I received from Chris recently from a 
swap challenge and I thought they would work hand in hand with this project 
alongside Chris' words of wisdom.

Here in words and pictures is my August*
Thank you *SEW* much tag.

Using an MDF Tag from Chris I first painted in white Gesso, then a coating of Leather Corset from Indigoblu and finally dry brushed on Warm Tan from left to right. When dry I pushed clear modelling paste through a stencil leaving the Handmade script visible.


Strips of Paperartsy lace stamped onto tissue paper have been added as collage 
across the bottom and top with a coating of matt medium.


The whole tag has been coated in a layer of watered down Antique Gold Shimmer and flicks of multi surface white paint flicked on top. Onyx black has been blended through 
a quilt stencil to give effect and the whole tag coated in a layer of clear Gesso
.
The orange mark is where I scorched it trying to dry it quickly..


Around the edges of the tag I stamped a stitch effect then stamped the dressmakers Manikin that was another gift from Chris onto tissue paper, tore around the edges and adhered using matt medium.

Now it's time to play by adding those doodles and embellishments.


White Posca pen helps highlight areas. buttons and pins add to it's theme and
a touch of gilding wax across the Handmade word brings it to life.


All tied up with a piece of Antique ribbon, Paperartsy words learn to sew 
have been stamped onto tissue and adhered, giving a thought for the day.

My Thank you *SEW* much August Tag is complete.


This has now been turned into a fridge magnet.

Thank you for taking time to pop on over.
Have a fabulous weekend everyone, i'll catch up with your posts and creativity on my return and look forward to sharing more of mine with you all very very soon.

Creative Hugs
Tracey xx

Tuesday, 25 July 2017

Paperbabe Stamps Challenge #52 ~ Sketch

Hello everyone I do hope you are all having a good week? I'm sharing a card I put together over the weekend for the Paperbabe Sketch challenge and thought i'd better share it with you all before the challenge is over.. Here's my very quick How to do's..!!

This challenge is a Sketch Challenge where Kim gives a prompt along with interpretations for inspiration. I must admit I struggled thinking this one out in my head so decided to get messy and create each part then think again on how I would piece it all together.

Here's my pieces..


.. laying down my Card foundation..

1: Chipped Sapphire and Black Soot Distress background
2: Tando Circle coloured in Caran D'Ache pastels and pencils. 
White Posca Marker dots and distressed edges using Black Soot.
3: Tando Butterfly coloured in Neocolor and Black Soot
4: Black strip of card with a Paperbabe sentiment stamped and embossed.


.. and finishing it all off with my focal feature of Little Red 
painted with water soluble pastels and pencils.


Phewwwww... I hope I got it right..?
It certainly kept my brain active and I'm quite pleased with the outcome 
apart from it needing the odd tweak here and there.
I hope you like it too..

Until next time stay safe..
Creative Hugs
Tracey xx

Crafty Supplies:
Paperbabe MayLeeDee Little Red Stamp Set
Paperbabe Wish Stamp
Tando Circle/Butterfly
Caran D'Ache Neocolor Pastels/Pencils (water soluble)
Tim Holtz Distress inks Chipped Sapphire/Black Soot
Posca White Marker Pen
Black Card/Versmark/Silver embossing powder.

Friday, 21 July 2017

All things Grunge Girl..

It's time for another challenge over on the That's Crafty Challenge Blog 
for residents in the UK and Northern Ireland
For the next two weeks the Theme will be *All Things Grunge* 
I hope you find time to share your 
Grungy creations with us and join in with the challenge over HERE
There's a £20 voucher to spend in the That's Crafty Store for the winning entry.

Here in words and pictures is my take on *All things Grunge*


I painted an MDF GiganTAG with two coats of White Gesso this gave me the surface tooth needed to create my Grunge Girl. Using the Dinky Eye Stencil I traced the outline with a pencil adding detail to the iris and giving the eye a pupil.


I then filled the GiganTag space by drawing a face, adding shadow, shade
and colour using caran d'Ache neocolor pastels and coloured pencils.


A Black Posca Marker has helped define the outer eye with shimmer paints
 dripped down the eye in a sequence of light to dark, pink, purple and Charcoal.


After the final detail has been added to the eyes the stencil has been laid back on top 
and 3D Gloss Gel pushed through it. The Gel although it appears white at first 
does dry completely clear giving a glossy raised effect over it.


I repeated the process giving more dimension and when dry I used the black Posca Marker to trace over the dry gel defining the darker areas of the eye and adding lashes.


Antique silver Shimmer paint has added a glimmer of light to the hair and glossy accents a shiny look to the lips. Sari Silk Ribbon with Tyvek Beads and pearls have added interest to my *GiganTAG Grunge Girl*


There's so many directions you can take with this challenge and I hope you like my take on *Anything Grunge* Thank you for sharing your time with me again and I look forward to seeing what route you take over the next fortnights Challenge.

Take care and Stay Safe..
Creative Hugs
Tracey xx

That's Crafty ~ White Gesso
That's Crafty Surfaces ~ MDF GiganTAG
That's Crafty Dinky ~ Stencil Eye TC089
That's Crafty Shimmer Paints Pink Purple Charcoal Antique Silver
Posca Marker Pens
Prima Art Basics 3D Gloss Gel Transparent
Ranger Inkessentials ~ Glossy Accents
Caran d'Ache ~ Neocolour pastels/pencils
Tyvek ~ Lots of How To Video's showing how to make Tyvek Beads online.

Tuesday, 18 July 2017

My Mini *Safekeeping* Book..

 Today i'm sharing a Mini book I created using an off cut of Hammer Card with a Distress Oxide/Sparkler Spray mop up background and the Beautiful You stamp set from
Rubber Dance Stamps Designed by Deborah Wainwright.

Here in lots of words and pictures is my Mini *Safekeeping* book.


Using StazOn I stamped onto clear Shrink Plastic. I've never had much success stamping onto clear as there's no tooth to it but using the Tim Holtz stamp platform really does keep the worry of it sliding around at bay. The image was coloured from the reverse side using Posca Markers. This takes some time to apply as the paint takes a while to dry so be patient if you intend to try this as you don't want to smudge it... it will dry eventually. 


Whilst the paint was drying I set about adding detail onto my 22cm by 7 cm sized off cut by machine sewing twine around the edges of what would be my mini book cover when folded. Using another off cut an insert was created with flaps to hold tiny useful things.


When the paint had dried the image was shrunken down in a pre-heated oven. 
An aperture was cut from the book cover and twine sewn around it's edge. 
This would be the window for the shrink plastic tile to peep through.


I placed the tile over the aperture and surrounded it with foam pads, this helped to level the page and also act as a cushion to protect the tile. The insert was then glued over the top and held in place with bulldog clips until the glue was completely dry. 


Sheets of folded paper are held with twine in the centre of the book cover for those little notes or lists and easily replaced when used up. Those bits and bobs that I tend to carry around with me but always fail drastically to find when needed are all now held in place.


A twine tie with some decorative Tyvek Beads help to keep it all neatly together.

My Mini *Safekeeping* Book is complete.


I've never made a mini book like this before and now folded it measures only 7cm x 11cm. 
A handy size to keep in my bag and a lot easier to find all those bits and bobs. 
I think i will definitely be making another. 
I'd like to share this with the Rubber Dance Stamps Team and join in their 

 Thank you for sharing your time with me today, 
I look forward to sharing with you all again soon.

Creative Hugs
Tracey xx

Crafty Supplies:

Rubber Dance Stamps ~ Beautiful You
StazOn ~ Jet Black
Tim Holtz Stamp Platform
Distress Oxides
Shrinkles Shrink Plastic (Clear)
Twine/Thread
Hammer Card
Tyvek
Bits and Bobs from the bottom of my bag.

Wednesday, 21 June 2017

Summer Solstice Girl..

*Summer Solstice* the astronomical first day of Summer and the longest day of the year
and boy has the UK been treated to plenty of sunshine over the past week. 

Reminding me of happy times ahead with friends and family.
 I'm sharing my Summer Solstice Girl using Kim Costello's Paperbabe
Female Face stamps and templates along with stamps by Rubber Dance.

As always... in words and pictures.

Tracing around the mini face template I marked all the feature points and stamped the facial features. Skin and facial tone colours were applied using my favourite pastels.


When blended the finer details have been added using a fine Posca Marker Pen,
although I may have over exaggerated the eyelashes just a little.
The image and hair have been cut out ready to stick onto a journal background.


I glued a piece of wool around the wavy bunch hairstyle adding stamped, coloured and fussy cut Flowers by Rubber Dance stamps. By gluing the flowers onto the band it allows a little movement to her Flower Crown rather than being glued flat directly onto the hair.


As my theme was the Solstice drawing a Stonehenge style monument in my Journal 
seemed fitting with the heel stone filtering the break of dawn through it.


Smaller fussy cut Flowers have decorated my Solstice Girls bunches completing 
my project as she waits for the magic the Summer Solstice may bring.


 Cosmic!!

Thank you for sharing your time, 
Take good care of yourselves..
Creative Hugs 
Tracey xx

I'd like to enter my Summer Solstice Girl into the following challenges.

Monday, 19 June 2017

Wild flower GigantTAG..

Hello everyone it's Monday again and it's my turn to share a little That's Crafty creativity.

Here is a sneak peek of my GiganTAG using the brand new That's Crafty Large Wild Flower embellishments and Shimmer Paints featured on last Fridays Hochanda shows .

Please click the link and pop on over to That's Blogging Crafty
for those *How to do's*


Thank you for sharing your time, 
I look forward to sharing another That's Crafty make with you all next Monday, 
until then take care of each other and stay safe.

Creative Hugs Tracey xx

Friday, 9 June 2017

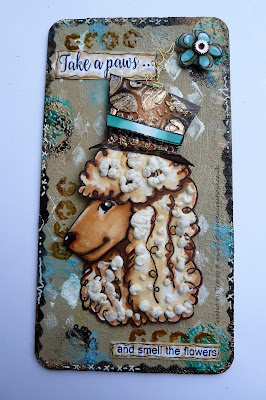
Poodle Power...!! Dog Eared That's Crafty Challenge Blog.

Morning everyone, a new challenge blog starts over at That's Crafty today and for the next two weeks the theme is Dog Eared. Using Rubber Dance Poodle Power Stamp set 
Designed by Donna Gray I've created a  Dog themed panel.

Here in words and pictures is my Dog Eared How to do's...


The poodle image has been stamped twice so I could layer up the curly fur, I coloured and cut out the areas I wanted to layer and applied Fluffy Stuff. This gives a raised effect just like popcorn when heated with a heat gun.


I covered the panel with texture sand paste and a coating of acrylic paint. I then decorated 
with a combination of  That's Crafty stamps and stencils.


The hat was created by pushing modelling paste through the dinky cogs stencil and highlighting with waxes when dry. Wire was added to the flower along with a watch cog to add interest.


Ranger paint dabbers help tie in the colours used on the panel and a stamped phrase which is part of the Poodle Power set.. Dots, dashes and a squiggle or two using my trusty Posca Pens help complete my Dog Eared panel piece.


Do pop along and see all the inspiration from the That's Crafty Design Team and I really do hope you will feel inspired to join in with this *Woofly*.. Dog Eared theme over at the
That's Crafty Challenge Blog. and the chance to win a £20 gift voucher to spend in the
That's Crafty Shop.... Now wouldn't that be just PAW_FECT..!!!

Have a fabulous weekend all..
Hugs Tracey xx

Crafty Supplies:
That's Crafty Grey/White board Panel 2
Rubber Dance Stamps Poodle Power
Rubber Dance Stamps UK Supplier
Ranger Acrylic Paint Dabbers
That's Crafty Stamps Textures Collection - Set 1
That's Crafty Dinky Stencil - Distressed Harlequin
That's Crafty Word Series WS002 Stencil
Alcohol Markers, Gesso, Woodware Fluffy Stuff, Archival Ink.

Friday, 12 May 2017

May Tag.. Time to Celebrate

May..!! What an eventful month and we are not midway yet. Lots of highs for me, 
lets not mention the flu bug that's tried to put a damper on things!  
One piece of uplifting news was being announced as one of four new additions to the superb That's Crafty Design Team, I had been sitting on this exciting announcement for quite some time and am so happy the cat is now out of the bag.

Thank you so much to Laura for thinking me worthy enough to be part of your DT family I'm looking forward to working alongside you all and sharing my first DT piece very soon. 

Meanwhile here is my May Tag using those prompts from the 12 week Tag Challenge


Priming a That's Crafty " Tag in white Gesso I covered in a layer of Marigold Acrylic Paint, then brayerd Calypso Blue Acrylic over the top. Using Modelling paste I chose to use it to press ribbon and threads onto my tag as collage.
A layer of diluted gold has been painted on top.


White acrylic has been splashed onto the tag and structure paste pushed through a stencil.
A coating of clear gesso has been applied all over and Rubber Dance little stamps stamped around the edges.


Good old gilding wax has helped bring out the detail with some pre-cut bunting found amongst my stash used as my focal image. I used a Tim Holtz words sticker, doodled and coloured the stamped images with posca marker pens and added a detailed button to embellish and highlight the *Celebrate* sentiment. Ribbon has been coloured with alcohol markers to co-ordinate with the bunting.


and my May Tag is complete. I do love all the hidden texture amongst these tags and when highlighted with gilding wax it's more like hidden treasure. I only wish my photography did all that treasure justice. Thank you again Chris* for those 12 weeks of wisdom..

Have a safe and happy weekend everyone..
Hugs Tracey xx

Crafty supplies:

DecoArt Americana: Marigold
DecoArt Americana: Calypso Blue
DecoArt Media Metallic Fluid (Gold)
DecoArt Modelling Paste
Imagination Crafts Structure Paste
Pebeo Gilding Wax Antique Gold
Posca Marker Pens
Rubber Dance Stamps UK Retailer
Ribbon, threads and a decorative button..