Pages

Showing posts with label Rubber Dance Stamps. Show all posts

Thursday, 3 December 2020

AJJ ~ The meaning of ... Art

 Hello everyone, 

As Decembers Guest Host @ Art Journal Journey 
i'm sharing my second journal spread 

I adore every aspect of art it allows me to explore, experiment and express. 
Nothing compares to the feeling of bringing a blank page to life with colour.. 

Collage and texture paste through stencils helps breaks up this surface 
where alcohol inks are dripped, sprayed and teased around the page. 


The stamped and painted brushes represent a small selection of tools 
I use to help me discover, demonstrate and make visual noise on a page. 


and not forgetting those paint tubes like little houses 
that help keep our precious paints all safe and sound.. 


Art it's within me.. like my beating HEART.. 

Stay safe & creative 
Hugs Tracey xx 

Sharing today's creativity with: 

Simon says Stamp Monday Challenge ~ Focus on Alcohol Inks

Wednesday, 20 May 2020

Happy 11th Anniversary WoywW #572

Hello creative friends, 

**Happy 11th Birthday WOYWW* 

a crafty safe place over @ the stamping ground where we 
can gather each Wednesday catch up with like minded folk 
and friends to share what's on our workdesks.


Guided by Julia to work on our UFO's to celebrate year 11* 
rather than the usual sharing of ATC's I've been playing with 
those found objects shared in #570.


Made an ATC those paint brushes represent the number 11.


covered a new journal.. now my #just for Wednesday's!


Put some simple paint dot decoration on the folk it heart and 
then attempted wet felting which is now my latest UFO 😏


The sun is up, my outdoor Woyww #572 is set up for the day 


I'm raising my cuppa to Julia and ALL the WOYWW gang... 


Keep creative everyone!! 
Tracey xx

Friday, 15 September 2017

Fly Away Family...

Hello everyone can you believe we are already midway through September.
How time does fly! Speaking of flying, "Fly Away" is this fortnights challenge theme 
over on the That's Crafty Challenge Blog. So if you would like to spread your wings 
and share your flights of fancy there's a chance to win a £20 voucher to spend in the 
That's Crafty online Store for the chosen winner.

Here's my Fly Away Family creation 
and those how to do's..


Using one *SIZE #10* and three *SIZE #1* MDF That's Crafty Tags , I first coated in white Gesso and scribbled on colourful water soluble pastels, spritzing with water to move them around the tag. After drying with a heat tool I placed the Bare Tree Stencil over the large tag and with a wet wipe traced around the stencil removing some of the colour. 


It leaves an effective glow around the tree image
as it reveals the gesso surface.


I stamped and embossed the large Mama Owl and the three smaller owls 
colouring with bright water soluble pastels. Both stamp sets from 
Rubber Dance are Designed by Melina Dahl.


I finished the tag backgrounds by dripping gold That's Crafty multi surface 
paint down the tags and spritzing with water to speed up the process.

Adding a strip of wood to the front and back of the tag gave me just enough thickness 
to screw in three hooks to act as hangers. Disguised by branches from the Mama Owl stamp set, Mama Owl sits perched proudly on top.


The three small *See No Evil- Hear No Evil & Speak No Evil* owls
fit perfectly on the small tags and with added chains hang onto the hooks.


My Fly Away Family key chain holder is complete.


This piece is quite symbolic for me having three children who one by one are 
flying the family nest, but they know exactly where to find me if needs be 
and as always Mama Owls wings will be wide open when they come to visit.

Thank you for sharing your time, I do hope you can join in with the challenge and 
please remember to check out the fabulous That's Crafty Design Teams makes
over HERE.

Until next time stay safe & take good care.

Creative Hugs
Tracey xx

*I'm sharing this with the Rubber Dance FOREVER Stamping Challenge,
a place to showcase your Rubber Dance Stamp makes with the anything goes theme*

Crafty Supplies:

That's Crafty MDF #1 Tags
That's Crafty MDF #10 Tags
That's Crafty Stencil: Bare Tree
That's Crafty Gesso: WHITE
That's Crafty Multi Surface Paint: GOLD
Rubber Dance Stamps: Mama Owl
Rubber Dance Stamps: Owl do Good
Caran D'ache Neocolor II water soluble wax pastels
Embossing powder/versafine ink

Sunday, 10 September 2017

Good Morning Flower.

Good Morning Flower!
I couldn't wait to use this Rubber Dance Bonny Bunny Stamp again, I've used it so many times this year as it resembles "Bingo" a Bunny my Daughter was given on her 8th Birthday. Everyone who every met him can recall his cheeky character and mannerisms.

Here is my "Good Morning Flower"
In words and pictures..


Stamped three times I painted the Bonny Bunny Stamp with a mix of 
black and white multi surface That's Crafty paint.


I painted a 5 x 3" plywood art pallet in Almond and Antique Mum 
acrylic paint and distressed with a hammer (Very therapeutic!)


I added back the finer detail I lost whilst painting by laying over the cut out images 
onto the stamp loaded up with archival ink. I could now begin to layer up the Bunny.


Layered and given threaded whiskers. I stamped and coloured two of the Rubber Dance Textured Flowers. Cut out I used a ball tool to add a little shape to the flowers.


After a quick fix with panel pins as the pallet really did fall apart,
I adhered the flowers around the Bonny Bunny.

  My "Good Morning Flower" project is complete.


I'm not sure how long this piece will sit on display before it is discovered by my 
Daughter but I must admit it brings a smile to my face every time I look at it.

Thank you for hopping on over.
Wishing you all a blessed Sunday.

Creative Hugs
Tracey xx

I'd like to enter this into the 
Rubber Dance Stamps September Colour Challenge

Crafty Supplies:

Art -C Plywood Pallet
Rubber Dance Stamps: Bonny Bunny UK Supplier
Rubber Dance Stamps: Textured Flowers UK Supplier
Alcohol markers
DecoArt Outdoor Patio Paint

Monday, 4 September 2017

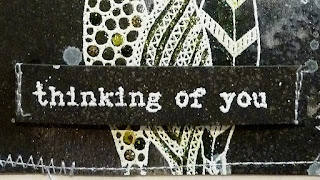
Thinking of YOU..!

Hello everyone, it's Monday again and time for me to share a sneaky peek
of my latest That's Crafty Design Team make.

Please pop on over HERE to see my quick card made for a HUG.


Hope to catch you over there.

Take care everyone and Stay Safe.
I'll see you all same time, same place next week 
for some more That's Crafty Creativity.

Crafty Hugs
Tracey xx

Thursday, 3 August 2017

Mini Gift bag make over plus some extras

Today i'd like to share a little revamped gift bag made for a swap challenge along with some other little makes all created using Rubber Dance Stamps Designed by Katy Leitch.

Here in words and pictures is my revamped mini gift bag plus..

Using Dylusions paints on a Gelli plate I printed both sides of the paper bag,
stamped randomly onto the print adding dabs and scrapes of gesso.


Paint in primary colours was dripped down the bag and the palette, paint brushes
 and wording stamped, coloured and cut. All from the Artist palette stamp set.


I made a tag using one of the paint tube stamps and decorated extra large paperclips by attaching the paint brush images, coloured in using neocolor pastels
 and Kuretake wink of stella clear, gold and silver brush pens.


Clipped onto the paper bag the paint brush paper clips really do look like
they are full size with their coordinating paint dips and drips.

My Mini altered Gift Bag is complete and ready to send to it's new home.


I also made some ATC's for another swap..


and a Birthday Card!
All having liquid pearls added for the dipped paint effect on the brushes.


I do love this stamp set, great designs and so handy for creating something Arty.

I'm linking this up with the all new Rubber Dance Stamps Forever Stamping Challenge
 a continuous challenge where you can showcase your Rubber Dance makes.

Thank you for stopping by today,
Take Care & Stay Safe

Creative Hugs
Tracey xx

Crafty Supplies:

Rubber Dance Stamps: Artist Palette
Mini Paper Gift Bag 3" x 5"
Gelli Plate 3" x  5"
Dylusions Paints: Vibrant Turquoise/Pure Sunshine
Caran D'Ache: Neocolor water soluble pastels
Kuretake Wink of Stella: Clear, Gold & Silver
Ranger Archival Ink: Jet Black
ATC's

Monday, 24 July 2017

Some Bunny Loves YOU..!!

Hi everyone, I hope you all had a good weekend ? Today i'm sharing some Bunny Love with you over on the That's Crafty Blog. Here's a sneak peek of the sweetest little Bunny in town.

Please hop on over HERE to see the full project and simple how to do's.


Have a great day everyone and don't forget to get your creative fix by checking out 
the creations from my super talented That's Crafty Design Team Mates, 
there's new makes each and every day!!

HOP to see you over there.. !!

Bunny Hugs
Tracey xx

Tuesday, 18 July 2017

My Mini *Safekeeping* Book..

 Today i'm sharing a Mini book I created using an off cut of Hammer Card with a Distress Oxide/Sparkler Spray mop up background and the Beautiful You stamp set from
Rubber Dance Stamps Designed by Deborah Wainwright.

Here in lots of words and pictures is my Mini *Safekeeping* book.


Using StazOn I stamped onto clear Shrink Plastic. I've never had much success stamping onto clear as there's no tooth to it but using the Tim Holtz stamp platform really does keep the worry of it sliding around at bay. The image was coloured from the reverse side using Posca Markers. This takes some time to apply as the paint takes a while to dry so be patient if you intend to try this as you don't want to smudge it... it will dry eventually. 


Whilst the paint was drying I set about adding detail onto my 22cm by 7 cm sized off cut by machine sewing twine around the edges of what would be my mini book cover when folded. Using another off cut an insert was created with flaps to hold tiny useful things.


When the paint had dried the image was shrunken down in a pre-heated oven. 
An aperture was cut from the book cover and twine sewn around it's edge. 
This would be the window for the shrink plastic tile to peep through.


I placed the tile over the aperture and surrounded it with foam pads, this helped to level the page and also act as a cushion to protect the tile. The insert was then glued over the top and held in place with bulldog clips until the glue was completely dry. 


Sheets of folded paper are held with twine in the centre of the book cover for those little notes or lists and easily replaced when used up. Those bits and bobs that I tend to carry around with me but always fail drastically to find when needed are all now held in place.


A twine tie with some decorative Tyvek Beads help to keep it all neatly together.

My Mini *Safekeeping* Book is complete.


I've never made a mini book like this before and now folded it measures only 7cm x 11cm. 
A handy size to keep in my bag and a lot easier to find all those bits and bobs. 
I think i will definitely be making another. 
I'd like to share this with the Rubber Dance Stamps Team and join in their 

 Thank you for sharing your time with me today, 
I look forward to sharing with you all again soon.

Creative Hugs
Tracey xx

Crafty Supplies:

Rubber Dance Stamps ~ Beautiful You
StazOn ~ Jet Black
Tim Holtz Stamp Platform
Distress Oxides
Shrinkles Shrink Plastic (Clear)
Twine/Thread
Hammer Card
Tyvek
Bits and Bobs from the bottom of my bag.

Wednesday, 21 June 2017

Summer Solstice Girl..

*Summer Solstice* the astronomical first day of Summer and the longest day of the year
and boy has the UK been treated to plenty of sunshine over the past week. 

Reminding me of happy times ahead with friends and family.
 I'm sharing my Summer Solstice Girl using Kim Costello's Paperbabe
Female Face stamps and templates along with stamps by Rubber Dance.

As always... in words and pictures.

Tracing around the mini face template I marked all the feature points and stamped the facial features. Skin and facial tone colours were applied using my favourite pastels.


When blended the finer details have been added using a fine Posca Marker Pen,
although I may have over exaggerated the eyelashes just a little.
The image and hair have been cut out ready to stick onto a journal background.


I glued a piece of wool around the wavy bunch hairstyle adding stamped, coloured and fussy cut Flowers by Rubber Dance stamps. By gluing the flowers onto the band it allows a little movement to her Flower Crown rather than being glued flat directly onto the hair.


As my theme was the Solstice drawing a Stonehenge style monument in my Journal 
seemed fitting with the heel stone filtering the break of dawn through it.


Smaller fussy cut Flowers have decorated my Solstice Girls bunches completing 
my project as she waits for the magic the Summer Solstice may bring.


 Cosmic!!

Thank you for sharing your time, 
Take good care of yourselves..
Creative Hugs 
Tracey xx

I'd like to enter my Summer Solstice Girl into the following challenges.

Friday, 9 June 2017

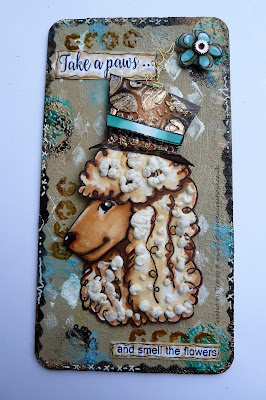
Poodle Power...!! Dog Eared That's Crafty Challenge Blog.

Morning everyone, a new challenge blog starts over at That's Crafty today and for the next two weeks the theme is Dog Eared. Using Rubber Dance Poodle Power Stamp set 
Designed by Donna Gray I've created a  Dog themed panel.

Here in words and pictures is my Dog Eared How to do's...


The poodle image has been stamped twice so I could layer up the curly fur, I coloured and cut out the areas I wanted to layer and applied Fluffy Stuff. This gives a raised effect just like popcorn when heated with a heat gun.


I covered the panel with texture sand paste and a coating of acrylic paint. I then decorated 
with a combination of  That's Crafty stamps and stencils.


The hat was created by pushing modelling paste through the dinky cogs stencil and highlighting with waxes when dry. Wire was added to the flower along with a watch cog to add interest.


Ranger paint dabbers help tie in the colours used on the panel and a stamped phrase which is part of the Poodle Power set.. Dots, dashes and a squiggle or two using my trusty Posca Pens help complete my Dog Eared panel piece.


Do pop along and see all the inspiration from the That's Crafty Design Team and I really do hope you will feel inspired to join in with this *Woofly*.. Dog Eared theme over at the
That's Crafty Challenge Blog. and the chance to win a £20 gift voucher to spend in the
That's Crafty Shop.... Now wouldn't that be just PAW_FECT..!!!

Have a fabulous weekend all..
Hugs Tracey xx

Crafty Supplies:
That's Crafty Grey/White board Panel 2
Rubber Dance Stamps Poodle Power
Rubber Dance Stamps UK Supplier
Ranger Acrylic Paint Dabbers
That's Crafty Stamps Textures Collection - Set 1
That's Crafty Dinky Stencil - Distressed Harlequin
That's Crafty Word Series WS002 Stencil
Alcohol Markers, Gesso, Woodware Fluffy Stuff, Archival Ink.

Friday, 2 June 2017

Dinky Art Shrine

Hi everyone, I've not been around for a week or so as I've been spending some much needed time with family and busying myself with some up and coming DT makes for That's Crafty. 

This little make is just for fun and a reminder for those of you that like to enter blog challenges that there is a cat themed *Feline Fine* Challenge over at That's Crafty Challenges and the chance to win a £20 voucher to spend in their shop

Here's my very simple Dinky Art Shrine in words and pictures..


I first painted the MDF back in a coating of Gesso, Inked up the Night Cat stamp 
by Rubber Dance Designed by Melina Dahl and placed the shrine back onto the 
area of the stamp image I wanted to transfer.


After assembling the shrine all held together with a spot of glue. I stamped and coloured the inside of the shrine using Alcohol Markers, I also stamped and coloured a separate cat image which was applied to the front of the shrine. Glossy accents adds dimension to the cats eyes and moon with dots and dabs of glitter glue all giving extra detail. 
White Posca Marker highlights the Kitty's finer details.


Modelling paste has been pushed through a Dinky Stencil and decorated when dry. 
Acetate glued onto the inside of the frame to act as a window, then the front frame 
glued onto the Shrine base to create the Dinky House Shrine.


I chose to add wire bunting and hang stars from the stamp to give the Kitty 
something to look at as he peeks from the outside in.


I do hope you get chance to join in with the challenge or just pop on over to see the inspiring DT makes and entries.. I will be away next week sharing a much 
needed holiday with my OH but all being well I will be sharing 
a couple of makes with you all during the week 
#if my schedules & timing are correct.. 

Stay Safe and as always Thank you for popping on over..

Creative Hugs from Tracey xx

Crafty Supplies:
That's Crafty - Dinky Art Shrine House
Rubber Dance Stamps - Night Cat (UK Retailer)
That's Crafty Dinky Stencil - Flowers TC093