Pages

Showing posts with label Ranger Archival Ink. Show all posts

Tuesday, 20 February 2018

Try it on Tuesday ~ Vintage Baked Frame

I was over the moon when I was asked to Guest Designer over at 
Try it on Tuesday this fortnight and with the theme being 
*Vintage* how could I possible resist.


Here is my Vintage* Baked Frame
and those *How to Do's*...

Stamping out a a dragonfly from Visible image I coloured in watercolour pencils.


Using a 11cm x 9 cm Size frame painted in warm tan paint
I placed the frame over the dragonfly inked up the stamp
and matching it up with the image kissing the frame with
the dragonflies delicate wings.


Colour matching the wings using the same watercolours I added 
a hint of vintage rose to the outer edge of the frame.


To add some raised detail to the frame I used Pebeo Cerne Relief 
to draw detail around the inside and outer edge.


When dry Versamark embossing ink was stamped all over 
the frame and bees wax baked Texture sprinkled all over it.


When heated it gives the most delicious colour and effect upon the frame.
With the dragonfly image fitted securely into the frame, co-ordinating glitter glue 
has been dotted across the glass covered wings and those stamped onto the frame.


Four flat back pearls sit neatly in each corner edged also with Cerne Relief.
A touch of gilding wax highlights those scrumptious baked bubbles.

Vintage Frame


I have another of these frames untouched, 
I may just have to decorate it in a similar way so it has a friend..

Thank you so much for visiting
and please do pop on over and check out the
Try it on Tuesday Design Teams Creations.

Take Care everyone.
Creative Hugs 
Tracey xx

Wednesday, 27 September 2017

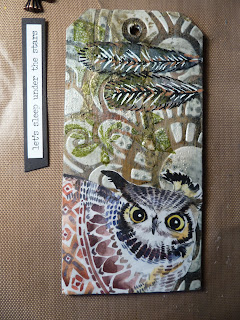
September Tag: Let's sleep...

Hello everyone, I seem to be cutting it very fine with these monthly Tags
it seems that as soon as the month arrives it fades just as quickly.

Today i'm sharing tag number #9 using the same prompts used
 each month for those of you that may have been following.


Here in words and pictures is my September Tag:

Covered in a coat of clear gesso, leather corset and warm tan acrylic paint,
modelling paste has been pushed through the Big Floral Stencil.


Paper feathers have been added as collage and coated in matt medium,
Pearl shimmer paint is painted all over and Gold paint allowed to drip down the Tag.

Black Soot Distress Oxide has added more detail rubbed through the Faded dots stencil.
A gentle application of clear Gesso seals most of the design without moving it too much.


Stamps from Card-io's blown away set are stamped on using Archival leaf green.

I found a very Quirky Owl image in a free papers booklet from 
Making Cards February 2017 edition, the same place I found the feathers.

Cut out I adhered the Owl to the bottom of the tag as I wanted 
to keep some of the Big Floral stencil visible.


A few doodles bring out the details on the feathers, a found sentiment from Tim Holtz Chit Chat book *Let's sleep under the stars*, along with some fibres and a gem or two..

 The final touches are ready to be added.


With the addition of glossy accent eyes
My September Tag is now complete:


Can't believe I managed to complete this without even a hint of gilding wax!!
Only three more to go until my full year's worth is complete.

Thank you for sticking around everyone.

Wishing you all warm hugs and lots of creativity.
Tracey xx

Thursday, 3 August 2017

Mini Gift bag make over plus some extras

Today i'd like to share a little revamped gift bag made for a swap challenge along with some other little makes all created using Rubber Dance Stamps Designed by Katy Leitch.

Here in words and pictures is my revamped mini gift bag plus..

Using Dylusions paints on a Gelli plate I printed both sides of the paper bag,
stamped randomly onto the print adding dabs and scrapes of gesso.


Paint in primary colours was dripped down the bag and the palette, paint brushes
 and wording stamped, coloured and cut. All from the Artist palette stamp set.


I made a tag using one of the paint tube stamps and decorated extra large paperclips by attaching the paint brush images, coloured in using neocolor pastels
 and Kuretake wink of stella clear, gold and silver brush pens.


Clipped onto the paper bag the paint brush paper clips really do look like
they are full size with their coordinating paint dips and drips.

My Mini altered Gift Bag is complete and ready to send to it's new home.


I also made some ATC's for another swap..


and a Birthday Card!
All having liquid pearls added for the dipped paint effect on the brushes.


I do love this stamp set, great designs and so handy for creating something Arty.

I'm linking this up with the all new Rubber Dance Stamps Forever Stamping Challenge
 a continuous challenge where you can showcase your Rubber Dance makes.

Thank you for stopping by today,
Take Care & Stay Safe

Creative Hugs
Tracey xx

Crafty Supplies:

Rubber Dance Stamps: Artist Palette
Mini Paper Gift Bag 3" x 5"
Gelli Plate 3" x  5"
Dylusions Paints: Vibrant Turquoise/Pure Sunshine
Caran D'Ache: Neocolor water soluble pastels
Kuretake Wink of Stella: Clear, Gold & Silver
Ranger Archival Ink: Jet Black
ATC's