Pages

Friday 30 June 2017

June Tag: Summer Skies..

Opps I nearly forgot to post this.. the year is speeding along so fast and as some of you may remember it's my own personal challenge to replicate those mini instructions from a previous challenge and create a new Tag each month.

Here in words and pictures is my June Tag:

I first covered a Size #8 Tag in White Gesso and covered in a layer of Blue Shimmer paint, when dry I painted a layer of Turquoise Shimmer paint over the top and made marks in the wet paint with the end of a paintbrush. Structure paste was then pushed through a Butterfly stencil.


Lace was added for collage and covered with a coating of matt medium.
A coating of Yellow Shimmer Paint over the whole tag gives a warm yellow glow but still allows the colours underneath to show through..
I dripped/Flicked white Gesso over the Tag.. (no idea where the pink came from..
*Note to self.. wash paint brushes out better!!)


Stencilled layers are applied using the TC Brick
background and vintage photo distress ink.
The whole tag is covered with Clear Gesso and little stamps
 are stamped randomly over the tag.


Using a Paperartsy image left over from some recent cards I made
 I fussy cut and glued the image onto the tag.
I doodled around the edges of the tag, adding glitter glue to the stamped image
and a touch of gilding wax (just couldn't resist..!) around the tags edge.
Finally I added the words Summer Skies from the same Paperartsy stamp set.

My June Tag is now complete.


I can not believe that this tag now takes me half way through the year and my personal challenge and I have to say each time I make one using those mini prompts
 it is a real pleasure of a make.

Thank you so much for visiting, taking time and interest.
I look forward as always to sharing more words and pictures with you all very soon.

Take good care of yourselves.
Creative Hugs Tracey xx

Crafty Supplies:
That's Crafty Tag
That's Crafty Shimmer Paints
That's Crafty: Flight of the Butterflies TC027
That's Crafty: Brick background TC026
DecoArt Matt Medium
Paperartsy Eclectica - Kay Carley 06

Monday 26 June 2017

Dance of the Dragonflies

Happy Monday everyone.. 
Can you believe this is the last Monday of the month, where has June gone?? 

It's my turn to share some That's Craft Creativity over on the *That's Crafty Blog * showcasing a project using new paints and surfaces from the That's Crafty range.

Here is a sneak peek of my Dance of the Dragonflies..*


Please fly on over HERE for those *How to Do's*

Thank you for taking time to visit I look forward to sharing more with you 
the same time next week. Until then Take Care and Stay Safe everyone.

Creative Hugs Tracey xx

Friday 23 June 2017

Keep it Simple.. That's Crafty Blog Challenge

It's time for a new Blog Challenge over at That's Crafty and the theme this fortnight is *Keep it Simple* So please pop on over Here to check out the inspirational makes from the DT and join in.. There's a chance to win £20 to spend in the That's Crafty Store.

Here in words and pictures is my Keep it Simple card..

On Kraft card I drew an Artists Paint Palette, cut it out and using the new That's Crafty Shimmer and Metallic paints I dropped a spot of each colour onto it.


As the paint is quite fluid I sprinkled embossing powder onto the larger spots of paint and heated it. I then added more paint over the top creating the illusion that the paint had been there for some time..


I stamped the sentiment from Lynnes Affirmations Set 2 onto a 5"x 5" card using Onyx Black Versafine, such a delicate font and Versafine picks up the fine detail perfectly.


The palette was mounted onto the card using foam pads and two old paint brushes 
glued on top. Doodles around the cards edge bring it all together.

My Artist Palette card is complete.


I do hope you find time to join in with the That's Crafty Keep it Simple Blog Challenge.
I look forward to seeing you and your crafty creations over there.

Creative Hugs Tracey xx

Crafty Supplies:

Thats's Crafty Paint
That's Crafty - Clear Stamp Set - Lynnes Affirmations Set 2
Versafine - Onyx Black
5"x 5" Blank Card
Kraft Card
Clear Embossing Powder

Wednesday 21 June 2017

Summer Solstice Girl..

*Summer Solstice* the astronomical first day of Summer and the longest day of the year
and boy has the UK been treated to plenty of sunshine over the past week. 

Reminding me of happy times ahead with friends and family.
 I'm sharing my Summer Solstice Girl using Kim Costello's Paperbabe
Female Face stamps and templates along with stamps by Rubber Dance.

As always... in words and pictures.

Tracing around the mini face template I marked all the feature points and stamped the facial features. Skin and facial tone colours were applied using my favourite pastels.


When blended the finer details have been added using a fine Posca Marker Pen,
although I may have over exaggerated the eyelashes just a little.
The image and hair have been cut out ready to stick onto a journal background.


I glued a piece of wool around the wavy bunch hairstyle adding stamped, coloured and fussy cut Flowers by Rubber Dance stamps. By gluing the flowers onto the band it allows a little movement to her Flower Crown rather than being glued flat directly onto the hair.


As my theme was the Solstice drawing a Stonehenge style monument in my Journal 
seemed fitting with the heel stone filtering the break of dawn through it.


Smaller fussy cut Flowers have decorated my Solstice Girls bunches completing 
my project as she waits for the magic the Summer Solstice may bring.


 Cosmic!!

Thank you for sharing your time, 
Take good care of yourselves..
Creative Hugs 
Tracey xx

I'd like to enter my Summer Solstice Girl into the following challenges.

Monday 19 June 2017

Wild flower GigantTAG..

Hello everyone it's Monday again and it's my turn to share a little That's Crafty creativity.

Here is a sneak peek of my GiganTAG using the brand new That's Crafty Large Wild Flower embellishments and Shimmer Paints featured on last Fridays Hochanda shows .

Please click the link and pop on over to That's Blogging Crafty
for those *How to do's*


Thank you for sharing your time, 
I look forward to sharing another That's Crafty make with you all next Monday, 
until then take care of each other and stay safe.

Creative Hugs Tracey xx

Monday 12 June 2017

Summer Sun Male Portrait using Papebabe templates and stamps.

Hello everyone hope you are all keeping well? As I've recently returned from a sunnier climate and the UK weather is utter pants I thought I would share a little sunshine.

This is a Journal page I created on Holiday using 
Kim Costello's Paperbabe Male Portrait templates and face stamps with the inspirational colours of the Rubber Dance June Colour Challenge of Blue, Sea Green and Sand in mind.

Here are those how to do's in words and pictures.

 Using a 8" x 6" Flat journal I traced around the face and neck templates along with the side swept bangs hairstyle. I quickly sketched the background using the view from my balcony taking all the fiddly bits away and accentuated areas of interest. 


Each area of the scene I named (just to remind me what they were!) I then coloured using Caran D'Ache Neocolour II Pastels and washed with water as they are water soluable.
Facial features were stamped using versafine ink with the hair stencil 
used as a mask when stamping the eyebrows.
Don't be scared by the garish appearance as it does all come together.. stick with me here!


Apologies for not having a breakdown of how I built this face up but I must say, 
sat overlooking the harbour I totally lost myself and before I knew it
 my face and hair was almost complete.
As you may spot I had forgotten to give this poor boy some ears but easily rectified by using the hair stencil as a mask again and stamping the ears where they needed to go.


I then proceeded to fill in the larger areas of the seascape adding depth to the sea as it gets deeper along the horizon along with shadow and shade to the male figure.


As you may see I have drawn around the stamped features using a fine liner pen this has not only added extra detail around the eyes but also allowed the stamped eyelashes to act as a shadow. Freckles have been added for that summer time look. 


Fine liner pen helps bring out the details of the palm trees with white Posca Pen adding a touch of light to both eyes, features and sea foam along the seas edge... 
My Summer Sun Male Portrait is complete.


The Paperbabe stencils and stamps are so easy to use and whilst away I managed to compose quite a few faces and I look forward to bringing some more male portraits to you in the very near future.

Thank you for taking the time to pop over and take a look fingers crossed it will encourage the Summer Sunshine to make an appearance where ever you are.

Creative Hugs from Tracey xx

I'd like to enter my Journal pages into the Rubber Dance June Colour Challenge

Join our Challenge, June 1st - 14th

Crafty Supplies:
Caran' D'ache Neocolour II : Classic/Summer Edition
8"x 6" Journal


Bronze and Verdigris Journal Cover.

Hi everyone It's Monday again and i'm back on terra firma after my holidays.
It's my time to share some creativity over on the That's Crafty Blog. 
Here's a little sneak peek of my Journal Cover but please follow the link for the full 
*How to do's over at That's Blogging Crafty! 


Hope to see you over there..

Creative Hugs Tracey xx

Friday 9 June 2017

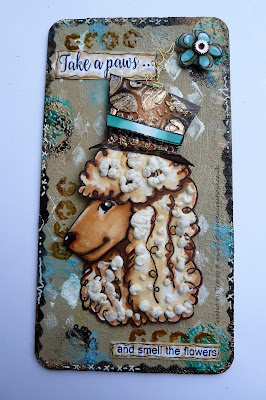
Poodle Power...!! Dog Eared That's Crafty Challenge Blog.

Morning everyone, a new challenge blog starts over at That's Crafty today and for the next two weeks the theme is Dog Eared. Using Rubber Dance Poodle Power Stamp set 
Designed by Donna Gray I've created a  Dog themed panel.

Here in words and pictures is my Dog Eared How to do's...


The poodle image has been stamped twice so I could layer up the curly fur, I coloured and cut out the areas I wanted to layer and applied Fluffy Stuff. This gives a raised effect just like popcorn when heated with a heat gun.


I covered the panel with texture sand paste and a coating of acrylic paint. I then decorated 
with a combination of  That's Crafty stamps and stencils.


The hat was created by pushing modelling paste through the dinky cogs stencil and highlighting with waxes when dry. Wire was added to the flower along with a watch cog to add interest.


Ranger paint dabbers help tie in the colours used on the panel and a stamped phrase which is part of the Poodle Power set.. Dots, dashes and a squiggle or two using my trusty Posca Pens help complete my Dog Eared panel piece.


Do pop along and see all the inspiration from the That's Crafty Design Team and I really do hope you will feel inspired to join in with this *Woofly*.. Dog Eared theme over at the
That's Crafty Challenge Blog. and the chance to win a £20 gift voucher to spend in the
That's Crafty Shop.... Now wouldn't that be just PAW_FECT..!!!

Have a fabulous weekend all..
Hugs Tracey xx

Crafty Supplies:
That's Crafty Grey/White board Panel 2
Rubber Dance Stamps Poodle Power
Rubber Dance Stamps UK Supplier
Ranger Acrylic Paint Dabbers
That's Crafty Stamps Textures Collection - Set 1
That's Crafty Dinky Stencil - Distressed Harlequin
That's Crafty Word Series WS002 Stencil
Alcohol Markers, Gesso, Woodware Fluffy Stuff, Archival Ink.

Monday 5 June 2017

That's Crafty.. Hats off to Steampunk!

Hello everyone, it's so nice to finally showcase my first Design piece for That's Crafty!

Here's a little sneak peek of my *Hats off to Steampunk* project.
Please follow the link Here and pop on over to That's Blogging Crafty to see my full
*How to do's* in words and pictures...


Take care and stay safe everyone and I look forward to
sharing a new crafty make with you all every Monday..

Creative Hugs Tracey xx

Friday 2 June 2017

Dinky Art Shrine

Hi everyone, I've not been around for a week or so as I've been spending some much needed time with family and busying myself with some up and coming DT makes for That's Crafty. 

This little make is just for fun and a reminder for those of you that like to enter blog challenges that there is a cat themed *Feline Fine* Challenge over at That's Crafty Challenges and the chance to win a £20 voucher to spend in their shop

Here's my very simple Dinky Art Shrine in words and pictures..


I first painted the MDF back in a coating of Gesso, Inked up the Night Cat stamp 
by Rubber Dance Designed by Melina Dahl and placed the shrine back onto the 
area of the stamp image I wanted to transfer.


After assembling the shrine all held together with a spot of glue. I stamped and coloured the inside of the shrine using Alcohol Markers, I also stamped and coloured a separate cat image which was applied to the front of the shrine. Glossy accents adds dimension to the cats eyes and moon with dots and dabs of glitter glue all giving extra detail. 
White Posca Marker highlights the Kitty's finer details.


Modelling paste has been pushed through a Dinky Stencil and decorated when dry. 
Acetate glued onto the inside of the frame to act as a window, then the front frame 
glued onto the Shrine base to create the Dinky House Shrine.


I chose to add wire bunting and hang stars from the stamp to give the Kitty 
something to look at as he peeks from the outside in.


I do hope you get chance to join in with the challenge or just pop on over to see the inspiring DT makes and entries.. I will be away next week sharing a much 
needed holiday with my OH but all being well I will be sharing 
a couple of makes with you all during the week 
#if my schedules & timing are correct.. 

Stay Safe and as always Thank you for popping on over..

Creative Hugs from Tracey xx

Crafty Supplies:
That's Crafty - Dinky Art Shrine House
Rubber Dance Stamps - Night Cat (UK Retailer)
That's Crafty Dinky Stencil - Flowers TC093