Pages

Monday 28 August 2017

Indian Summer Skies

Hi everyone, it's Bank Holiday Monday here today and for those of you 
in the UK I hope you've all had a relaxing extended weekend. 

It's my turn to share some That's Crafty Creativity over HERE today

Here's a sneaky peek of a little project inspired by those Indian Summer Skies.
So please pop on over to the That's Crafty Blog HERE
for those *How to Do's*


and check out the That's Crafty Design Teams Blogs 
throughout the rest of the week.

Have a great week everyone.
Creative Hugs

Tracey xx

Friday 25 August 2017

August Tag.. Thank you *SEW* much ..

Hello creative Friends, today i'm sharing Augusts Tag using those 12 weeks of prompts.
Tag No:8 oh gosh not many more left before I complete my personal challenge
of creating a different one each month using those very same prompts.

 This post is a scheduled one as I will be away and probably not have much time 
when I return to create or post before September sneaks in.

This tag is created using some goodies I received from Chris recently from a 
swap challenge and I thought they would work hand in hand with this project 
alongside Chris' words of wisdom.

Here in words and pictures is my August*
Thank you *SEW* much tag.

Using an MDF Tag from Chris I first painted in white Gesso, then a coating of Leather Corset from Indigoblu and finally dry brushed on Warm Tan from left to right. When dry I pushed clear modelling paste through a stencil leaving the Handmade script visible.


Strips of Paperartsy lace stamped onto tissue paper have been added as collage 
across the bottom and top with a coating of matt medium.


The whole tag has been coated in a layer of watered down Antique Gold Shimmer and flicks of multi surface white paint flicked on top. Onyx black has been blended through 
a quilt stencil to give effect and the whole tag coated in a layer of clear Gesso
.
The orange mark is where I scorched it trying to dry it quickly..


Around the edges of the tag I stamped a stitch effect then stamped the dressmakers Manikin that was another gift from Chris onto tissue paper, tore around the edges and adhered using matt medium.

Now it's time to play by adding those doodles and embellishments.


White Posca pen helps highlight areas. buttons and pins add to it's theme and
a touch of gilding wax across the Handmade word brings it to life.


All tied up with a piece of Antique ribbon, Paperartsy words learn to sew 
have been stamped onto tissue and adhered, giving a thought for the day.

My Thank you *SEW* much August Tag is complete.


This has now been turned into a fridge magnet.

Thank you for taking time to pop on over.
Have a fabulous weekend everyone, i'll catch up with your posts and creativity on my return and look forward to sharing more of mine with you all very very soon.

Creative Hugs
Tracey xx

Monday 21 August 2017

Christmas comes early AGAIN

Hi everyone It's Monday again, hope your weekend has been a good one?
As usual it's my turn to share some more That's Crafty Creativity over HERE today.

Todays project showcases some of the brand new products featured 
on Hochanda last Friday now available to purchase
in the online That's Crafty Store.

Here's a sneaky peek..!
I hope to see you over THERE
for those How to Do's.


Have a fabulous week everyone until next week.
Take Care & Stay Safe.

Crafty Hugs
Tracey xx

Friday 18 August 2017

Christmas comes Early..

Hello everyone, it's looking a little chilly on my blog today 
with my first Christmas post of the year.

It's time for another That's Crafty Blog Challenge over HERE
with this fortnights theme being *Only Cards*
and a chance for you to win £20 to spend in the
That's Crafty online Store.

Here in words and pictures is my
*Christmas comes Early Card*


Using the Newly released Christmas Stamp Set 2 Designed by Donna Gray 
I stamped the focal image multiple times, colouring with water colour pencil. 
Onto the main card image I painted the background using Icicle Blue Multi Surface paint 
and would later layer up both house and trees to create dimension.


I created snowfall by layering up lace, threads and strips of Tyvek previously heated gently with a heat gun to shrink and create texture. All fabric and threads were sewn onto the card with the Tyvek glued on last as it can become hard in places and difficult to sew. 
A touch of Multi Surface Antique Silver helps create shadow and 
micro beads help to fill in the gaps as well as adding a little interest.


Falling snow was achieved by pushing White Multi Surface Paint 
through the Christmas Tree Stencil onto the card background. 
This stencil not only has a large lace effect tree but also 
the most useful snowflakes and snow drop dots included.
I can see this stencil being a firm Christmas favourite with many as well as myself.


I stippled Pearl Multi Surface Paint onto two greyboard 
Snowflake surfaces, layered them both up adding a central gem stone 
for a little bit of Christmas sparkle.


Mat and layered onto a 7 x 5 card the Snowflakes embellish the corner with 
a Tim Holtz die cut Sentiment word finishing it all off.


I know it's only August but us crafty people always want to prepare ahead at least
one season in advance and because there are so many *New and *Fabulous That's Crafty
Autumn and Christmas products just released I thought it was the perfect timing
 to bring them to life and make them shine.

Thank you for sharing your time,
Take Care and Stay Safe.

Until Next Time
Crafty Hugs
Tracey xx

Crafty Supplies:

That's Crafty Poinsettia Tree Stencil
Snowflake Surfaces: Large, Small
Tim Holtz Sentiment Words


Wednesday 16 August 2017

*Anniversary Wishes*

Hello everyone.. Thank you for stopping by.

I don't often post makes that are personal but as today is a special day
and this stamp set makes me giggle each time I use it 
I thought I would share this one with you all.

Here in words and pictures are those How to do's..
Weeeeeeeeeee...!!!!


Using Tim Holtz sentiment dies I cut out the words adding colour by
mopping up some spritzed Antique Linen and Salty Ocean Distress Oxides


The balloons were stamped, heat embossed, coloured with pencil and cut out.
Using foam pads I began to build up the balloons each one representing a year..
*It's a BIG Bunch*


Strings have been drawn on the Balloons using a fine liner pen and 
the stamped and embossed girl adhered as if she is flying off the card.
Mat and layered onto black card helps those words pop.


My Anniversary card is complete!


*Happy Anniversary Hubby*

Let the fun times continue xxx

Until next time, stay safe everyone
Creative Hugs
Tracey xx

I'd like to enter this into the
Rubber Dance Stamps EMBOSSING Theme Challenge.

Crafty Supplies:

AALL & Create Clear Stamps: #5 Designed by Olga Heldwein
Versafine: Onyx Black Ink
Clear Embossing Powder
Tim Holtz Thinlit Dies: Sentiment Words
Tim Holtz Distress Oxides: Antique Linen & Salty Ocean
Coloured Pencils (Caran d'ache Supracolor ~ my personal choice)
Water Colour Card/Black Card
Foam Pads

Monday 14 August 2017

*Happy little Beach Huts*

Hello everyone, hope you've all had a great weekend? 

I'm sharing a Happy little creation over on the That's Crafty Blog today 
hoping to brighten those rainy days we have been experiencing in the UK recently.

Here's a sneaky peek at my *Happy Little Creation*...
For the full picture please pop on over HERE.


I hope to see you over there.
Have a great week everyone, take care 
and lets hope to see some sunshine before Summer ends !..

Creative Hugs
Tracey xx

Monday 7 August 2017

Tyvek *Shimmering Butterfly* ATC

Morning Crafty Friends, I hope you had a great weekend ?
 Mine was full of creative disasters spiralling from one mistake to another, 
but Thankfully it came and went in a flash and I find it's Monday again 
and I'm here sharing a Tyvek covered ATC over on the That's Crafty Blog.

Here's a little sneaky peek but if you'd like to see a little more 
please pop on over HERE to see the full picture and *How to Do's*


Thank you for stopping by 
I hope to see you over there.

Take good care everyone and I look forward to sharing 
more creativity with you again very soon.

Crafty Hugs
Tracey xx

Friday 4 August 2017

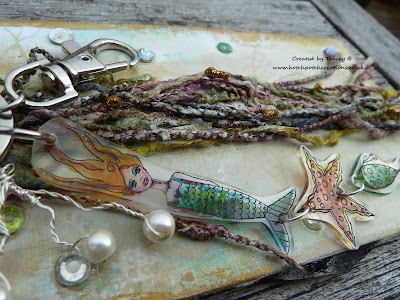
It's not just for Kids..!! Shrink plastic Key ring..

It's Friday again.. YAY..!! One small step away from the weekend.
It's also time for a brand new Challenge Theme over 
.. and a chance to win £20 in the That's Crafty Store.

This fortnights theme is *Anything BUT cards*

Please pop on over HERE and check out the DT's inspirational makes.

Here's my little *Anything BUT cards* creation, in words and pictures.


Using the Marina Stamp set I stamped onto clear shrink plastic with 
Black StaZon and coloured in on the reverse side using alcohol markers.


I cut around the images leaving a border and punched holes where I wanted the jump rings to be  attached. Now its time to bake them, I always use an oven for shrink plastic as it works much better for me than a heat tool but that's just my personal choice.
Follow the manufacturers instructions as they can vary from brand to brand.


Jump rings fasten the shrink plastic pieces together and a gathering
of Maya fibres help add interest along with twisted wire pearls.
All finally attached to a Key ring with lobster clasp.

 My baked shrink plastic Key ring is complete.


A fun little make perfect to entertain the Children
over the Summer Holidays and a bit of
 low calorie baking for the Adults.

Thank you for taking time to pop on over
 I look forward to seeing your Crafty Creations over at the
That's Crafty Challenge Blog.

Creative Hugs
Tracey xx

Crafty Supplies:

That's Crafty Stamps Deep Sea Divas: Marina
StaZon ~ Jet Black
Alcohol Markers
Jump rings, Key ring & Lobster Clasp.
Maya Fibres.

Thursday 3 August 2017

Mini Gift bag make over plus some extras

Today i'd like to share a little revamped gift bag made for a swap challenge along with some other little makes all created using Rubber Dance Stamps Designed by Katy Leitch.

Here in words and pictures is my revamped mini gift bag plus..

Using Dylusions paints on a Gelli plate I printed both sides of the paper bag,
stamped randomly onto the print adding dabs and scrapes of gesso.


Paint in primary colours was dripped down the bag and the palette, paint brushes
 and wording stamped, coloured and cut. All from the Artist palette stamp set.


I made a tag using one of the paint tube stamps and decorated extra large paperclips by attaching the paint brush images, coloured in using neocolor pastels
 and Kuretake wink of stella clear, gold and silver brush pens.


Clipped onto the paper bag the paint brush paper clips really do look like
they are full size with their coordinating paint dips and drips.

My Mini altered Gift Bag is complete and ready to send to it's new home.


I also made some ATC's for another swap..


and a Birthday Card!
All having liquid pearls added for the dipped paint effect on the brushes.


I do love this stamp set, great designs and so handy for creating something Arty.

I'm linking this up with the all new Rubber Dance Stamps Forever Stamping Challenge
 a continuous challenge where you can showcase your Rubber Dance makes.

Thank you for stopping by today,
Take Care & Stay Safe

Creative Hugs
Tracey xx

Crafty Supplies:

Rubber Dance Stamps: Artist Palette
Mini Paper Gift Bag 3" x 5"
Gelli Plate 3" x  5"
Dylusions Paints: Vibrant Turquoise/Pure Sunshine
Caran D'Ache: Neocolor water soluble pastels
Kuretake Wink of Stella: Clear, Gold & Silver
Ranger Archival Ink: Jet Black
ATC's