Pages

Friday, 29 September 2017

Autumn Journal Cover.. (Part 1..)

Hello everyone,
It's time again for a new theme over on the That's Crafty Challenge Blog
and this theme is one of my favourites *Forever Autumn*
If you are in the UK and would like to showcase your Autumnal makes there's a chance
to win £20 to spend in the That's Crafty Online Store for the chosen winner.
Hope to see you over THERE..

Here in words and pictures is my Autumn Journal Cover Creation (Part 1..)


The long awaited Eileen Hull XL Journal Die was a considered purchase for me
and one I have a master plan for on a personal level so please watch this space..

Cutting out both halves of the cover using two white/greyboard 10" x 8" panels
 I glued them together and scraped on Multi Surface paint of Autumnal shades.
Dried with a heat tool I then pushed paste through the Maple and Skeleton Leaf Stencils.


When dry I painted over the paste with the same colours used on the cover.
Yellow, Christmas Green, Red & Bronze.


Adding scrapes of Multi Surface Gold I dry brushed areas of the cover
using That's Crafty's own brand Multi Surface Chestnut Brown paint.
I love how areas of the white board peep through!


With wooden beads threaded through the journal clasp Greyboard leaves are
painted, scored then glued onto the front of the clasp for Autumnal decoration.
The empty end of the clasp is then glued to the outer edge of the back cover.

Elasticated string is threaded through the given holes of the die cut cover
and I have allowed for extra string so it can be wrapped around more than once,
thinking ahead as the contents of the inside may expand over time.


Finally the book plate has been carved into with a craft knife,
painted using the same colour palette and embossed with UTEE.
Brads with heated Multi Surface Paints adds the final detail.


My Autumn Journal Cover is complete... (nearly)


Autumn is my favourite season of all with the little animals and insects busying themselves having their last burst of energy before their sleepy time arrives in winter.

I feel a little like those busy animals and insects at the moment with family life and projects this is why I have chosen to save the inside of the Journal for another day..
Autumn Journal Part 2 coming soon..!

Until next time, Stay Safe everyone.
Warm (((Hugs))) and much creativity
Tracey xx


Crafty Supplies:

Sizzix Scoreboard XL Journal Designed by Eileen Hull
That's Crafty White/Greyboard Surface Panels 10"x 8"
That's Crafty Stencils: Maple Leaf & Skeleton Leaves
Texture Paste
That's Crafty Multi Surface Paints
That's Craft: Greyboard Leaves
Elasticated string/Wooden beads/Metal Brads/UTEE

Wednesday, 27 September 2017

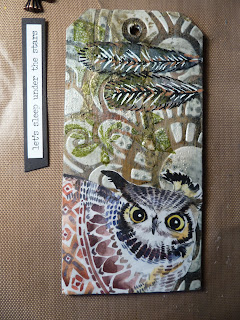
September Tag: Let's sleep...

Hello everyone, I seem to be cutting it very fine with these monthly Tags
it seems that as soon as the month arrives it fades just as quickly.

Today i'm sharing tag number #9 using the same prompts used
 each month for those of you that may have been following.


Here in words and pictures is my September Tag:

Covered in a coat of clear gesso, leather corset and warm tan acrylic paint,
modelling paste has been pushed through the Big Floral Stencil.


Paper feathers have been added as collage and coated in matt medium,
Pearl shimmer paint is painted all over and Gold paint allowed to drip down the Tag.

Black Soot Distress Oxide has added more detail rubbed through the Faded dots stencil.
A gentle application of clear Gesso seals most of the design without moving it too much.


Stamps from Card-io's blown away set are stamped on using Archival leaf green.

I found a very Quirky Owl image in a free papers booklet from 
Making Cards February 2017 edition, the same place I found the feathers.

Cut out I adhered the Owl to the bottom of the tag as I wanted 
to keep some of the Big Floral stencil visible.


A few doodles bring out the details on the feathers, a found sentiment from Tim Holtz Chit Chat book *Let's sleep under the stars*, along with some fibres and a gem or two..

 The final touches are ready to be added.


With the addition of glossy accent eyes
My September Tag is now complete:


Can't believe I managed to complete this without even a hint of gilding wax!!
Only three more to go until my full year's worth is complete.

Thank you for sticking around everyone.

Wishing you all warm hugs and lots of creativity.
Tracey xx

Monday, 25 September 2017

Autumn Wood Shadow Box

Hello everyone, hope you are all keeping well?

Today I am sharing a sneaky peek of one of my That's Crafty Creations.
A Seasonal make in celebration of all things Autumn.

For the full How to do's click the pink link and pop on over HERE
to the That's Blogging Crafty Blog Site.


Thank you for your shared time,
I hope to see you over there.

Until *next week*.. Stay safe everyone

Creative Hugs
Tracey xx

Monday, 18 September 2017

Make a Wish.. it's your Birthday.

Hello everyone, hope you are all keeping well?

Today is a very special day as it's my Mom's Birthday.
*Happy Birthday Mom*

This sneaky peek is quite fitting for today's celebrations.
For my latest That's Crafty Creation please pop on over HERE
to visit the That's Blogging Crafty Blog 
for some very quick and simple *How to Do's*


Wishing you all a fabulous week
until next time.

Take Care & Stay Safe everyone.

Crafty Hugs
Tracey xx

Sunday, 17 September 2017

Family Portrait...

Meet my eldest Son..!! 

This has been hidden away unfinished for a good few weeks now waiting to be completed and given as a long awaited housewarming gift. I finished the Female a while back but something always seemed to get in the way to stop me from completing this.

Here in words and pictures is my creation..


From the Mens MDF Portrait media blanks by Paperbabe I Stamped on the 
facial details with the mens face stamps and painted using a real hotchpotch of acrylics.


I used one of the Paperbabe DesignA Knit Stamps to stamp and then emboss to 
add texture to the garment pieces. They were then painted and a 
whisper of silver gilding wax rubbed over to make the design pop out.

Painting the hair in black gesso I scored into it with a 
pokey tool to create the illusion of strands.


With the pieces glued together I could now work on the finer detail, 
tone down areas of colour I felt were too loud and add some stubble.

I traced around the head shape onto thick card to create the back of the head and
using truffle brown acrylic, I was able to bring out a more realistic hair shade.


This is how he looks from the back, along with a little hood to add a bit more detail.
If I had thought this out properly I would have created it a lot more larger than this.


Here he is from the front with added eyelets and cord.


and here he is with his lovely lady.
At last both complete and ready to be collected.


*How to do's* of the Female Media Blanks *Butterfly Girl* can be found HERE.

I now look forward to giving them to the Happy Couple later today
and wish them both all the best in their *New Home*..

Thank you for sharing a moment of your day with me
and I hope the rest of your day is a peaceful one.

Creative Hugs
Tracey xx


Crafty Supplies:

Paperbabe Mens MDF Portrait media blanks: Side Swept Bangs
Paperbabe Male Face Stamps
Acrylic Paint.

Friday, 15 September 2017

Fly Away Family...

Hello everyone can you believe we are already midway through September.
How time does fly! Speaking of flying, "Fly Away" is this fortnights challenge theme 
over on the That's Crafty Challenge Blog. So if you would like to spread your wings 
and share your flights of fancy there's a chance to win a £20 voucher to spend in the 
That's Crafty online Store for the chosen winner.

Here's my Fly Away Family creation 
and those how to do's..


Using one *SIZE #10* and three *SIZE #1* MDF That's Crafty Tags , I first coated in white Gesso and scribbled on colourful water soluble pastels, spritzing with water to move them around the tag. After drying with a heat tool I placed the Bare Tree Stencil over the large tag and with a wet wipe traced around the stencil removing some of the colour. 


It leaves an effective glow around the tree image
as it reveals the gesso surface.


I stamped and embossed the large Mama Owl and the three smaller owls 
colouring with bright water soluble pastels. Both stamp sets from 
Rubber Dance are Designed by Melina Dahl.


I finished the tag backgrounds by dripping gold That's Crafty multi surface 
paint down the tags and spritzing with water to speed up the process.

Adding a strip of wood to the front and back of the tag gave me just enough thickness 
to screw in three hooks to act as hangers. Disguised by branches from the Mama Owl stamp set, Mama Owl sits perched proudly on top.


The three small *See No Evil- Hear No Evil & Speak No Evil* owls
fit perfectly on the small tags and with added chains hang onto the hooks.


My Fly Away Family key chain holder is complete.


This piece is quite symbolic for me having three children who one by one are 
flying the family nest, but they know exactly where to find me if needs be 
and as always Mama Owls wings will be wide open when they come to visit.

Thank you for sharing your time, I do hope you can join in with the challenge and 
please remember to check out the fabulous That's Crafty Design Teams makes
over HERE.

Until next time stay safe & take good care.

Creative Hugs
Tracey xx

*I'm sharing this with the Rubber Dance FOREVER Stamping Challenge,
a place to showcase your Rubber Dance Stamp makes with the anything goes theme*

Crafty Supplies:

That's Crafty MDF #1 Tags
That's Crafty MDF #10 Tags
That's Crafty Stencil: Bare Tree
That's Crafty Gesso: WHITE
That's Crafty Multi Surface Paint: GOLD
Rubber Dance Stamps: Mama Owl
Rubber Dance Stamps: Owl do Good
Caran D'ache Neocolor II water soluble wax pastels
Embossing powder/versafine ink

Monday, 11 September 2017

All geared up Jewellery Hanger.

Hello everyone, I hope you have had a creative weekend?

Today I'm sharing some more Rustica Goodness over on the That's Crafty Blog. 
Here's a sneaky *Rustica* peek with those full How to do's over HERE.

I hope to see you over THERE.


Have a safe and happy day everyone,
until next time, take good care.

Crafty Hugs
Tracey xx

Sunday, 10 September 2017

Good Morning Flower.

Good Morning Flower!
I couldn't wait to use this Rubber Dance Bonny Bunny Stamp again, I've used it so many times this year as it resembles "Bingo" a Bunny my Daughter was given on her 8th Birthday. Everyone who every met him can recall his cheeky character and mannerisms.

Here is my "Good Morning Flower"
In words and pictures..


Stamped three times I painted the Bonny Bunny Stamp with a mix of 
black and white multi surface That's Crafty paint.


I painted a 5 x 3" plywood art pallet in Almond and Antique Mum 
acrylic paint and distressed with a hammer (Very therapeutic!)


I added back the finer detail I lost whilst painting by laying over the cut out images 
onto the stamp loaded up with archival ink. I could now begin to layer up the Bunny.


Layered and given threaded whiskers. I stamped and coloured two of the Rubber Dance Textured Flowers. Cut out I used a ball tool to add a little shape to the flowers.


After a quick fix with panel pins as the pallet really did fall apart,
I adhered the flowers around the Bonny Bunny.

  My "Good Morning Flower" project is complete.


I'm not sure how long this piece will sit on display before it is discovered by my 
Daughter but I must admit it brings a smile to my face every time I look at it.

Thank you for hopping on over.
Wishing you all a blessed Sunday.

Creative Hugs
Tracey xx

I'd like to enter this into the 
Rubber Dance Stamps September Colour Challenge

Crafty Supplies:

Art -C Plywood Pallet
Rubber Dance Stamps: Bonny Bunny UK Supplier
Rubber Dance Stamps: Textured Flowers UK Supplier
Alcohol markers
DecoArt Outdoor Patio Paint

Tuesday, 5 September 2017

Warm Hugs..!

I've been itching to use these candle substrates by Paperbabe, as soon as I saw them
I had so many ideas of how they could be used. I jotted down a few
as ideas can easily be forgotten when times are busy.

I decided to incorporate one of my ideas with the latest Sketch challenge, 
Here in words and pictures is my Warm Hugs Card.


Using an A4 sheet of stamping card I painted it sporadically in white Gesso and dried with a heat tool. When completely dry I Stamped all over the page both large and small Pom Pom stamps from the DesignA Knit set and heat set with white embossing powder.
Spritzed with Bayou Gold starburst spray. The embossed pom poms act as a resist, the Gesso resists the spray slightly and the plain card takes the full colour of the spray.
A great effect using just one colour.

Cut to the required size I used the left over card to cut the banner shapes from the
Paperbabe Sketch. I also cut and coloured a circle another Sketch prompt.


I found just enough space on my background to stamp this Paperbabe sentiment. 
I love how it leaves  a blank area for you to stamp or write a name of your choice. 
This time I just stamped the word *your* also from the DesignA Knit set.

                     
Coloured with neopastels I coated the  candles in clear versamark and heat embossed 
with clear embossing powder accentuating those waxy candle drips.


With the Sketch prompts edged in gold embossing powder and layered onto the card
my *Warm Hugs* Card is complete.


I love how the colours blend so well together from subtle creams to rich golds, the romance of the sentiment and the reference of light and life. A real joy to make.

Take Care everyone until next time.

Creative Hugs
Tracey xx

I'd like to enter this into the
Paperbabe Stamps Challenge #55 Sketch

Crafty Supplies:

Paperbabe: DesignA Knit Stamp Set
Paperbabe: MDF Candle Substrates
Stamping Card
White Gesso
Versamark Embossing Ink
White Embossing Powder
Lindy's Stamp Gang Sparkle Spray: Bayou Boogie Gold
Stampendous Fine Deatil: Gold Embossing Powder
Caran D'ache neocolor II pastels

Monday, 4 September 2017

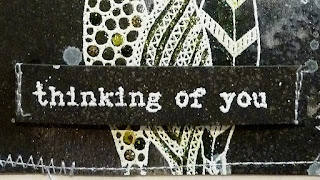
Thinking of YOU..!

Hello everyone, it's Monday again and time for me to share a sneaky peek
of my latest That's Crafty Design Team make.

Please pop on over HERE to see my quick card made for a HUG.


Hope to catch you over there.

Take care everyone and Stay Safe.
I'll see you all same time, same place next week 
for some more That's Crafty Creativity.

Crafty Hugs
Tracey xx

Friday, 1 September 2017

All geared up..!!

It's time for another challenge over at That's Crafty! and a chance to win a £20 
gift Voucher to spend in the That's Crafty Store. This fortnight the theme is *Rustica*

Here's my take on *Rustica* in words and pictures.


Using the small cog surfaces I painted in black Gesso,
dabbed on DecoArt textured sand and then painted
the surfaces with a mixture of the new multi surface paints,
Christmas Red, Chestnut Brown and Metallic Bronze.
Dots and dabs of Yellow, White and Teal Multi Surface Paint
adds depth to the Rusted effect.


The large circle is waste from the larger Cogs set but super handy. Painted in the same way this was glued into a 30mm Pendant bezel with 3D Gel and the small cogs glued  on top.


Bronze, Chestnut Brown and Teal multi surface paint have been paint on to Tyvek, scrunched up and cut into think triangular pieces. These have then been rolled around a wooden skewer large end first, pinned into place and gently heated with a heat tool until they fuse together. When cooled your created bead can be pulled of the skewer.


I hand wrapped a wire finding creating loops so each bead
could be fastened together to create a necklace.
A distressed slipknot cord has been attached to extend or shorten its length.


To seal the disc into the bezel I applied a layer of liquid glass and allowed it to dry for a day.
When dry I found the liquid glass too shiny so I painted over with a mixture of 
Bronze and Chestnut Multi surface paint to give it a matt effect.
Dots of teal multi surface paint made it all blend in with the cogs and gears on top.


A brad, gem stone and a dab or two of micro beads complete my 
All Geared up Pendant Necklace.


I hope you have enjoyed my take on *Rustica* 
and do hope you can join in with the Challenge over HERE
or just stop by to take a look at the inspiration the Design Team 
have created just for you this challenge.

I look forward to seeing  all your 
makes over the next fortnight.

Take Care and Stay Safe everyone.

Crafty Hugs
Tracey xx

Crafty Supplies:

That's Crafty Surfaces: Small Cogs
That's Crafty Surfaces: Large Cogs
DecoArt Textured Sand Paste
That's Crafty: Black Gesso
Glue
Micro Beads
Brad & Gem stone.
Bezel 30mm, Wire & Cord