Pages

Showing posts with label #That's Crafty Blog Challenge. Show all posts

Wednesday, 18 July 2018

Be the Smile.. It's a That's Crafty Challenge REMINDER..

Hello Creative Friends,

It's time to remind you of the Challenge going on over on the That's Crafty Blog..

If you'd like to share your creative side with us we'd love to see you over THERE
Pop on over and read those entry rules there's prizes to be won.. !!

*Here's a little That's Crafty creation and how it came to be..*

Scraping paints onto a greyboard Tag I created a background


Stamping Lynne's sunflowers onto rice paper using versafine 
the images were gently torn around and pasted onto the tag 
with a watered down solution of multi purpose glue.
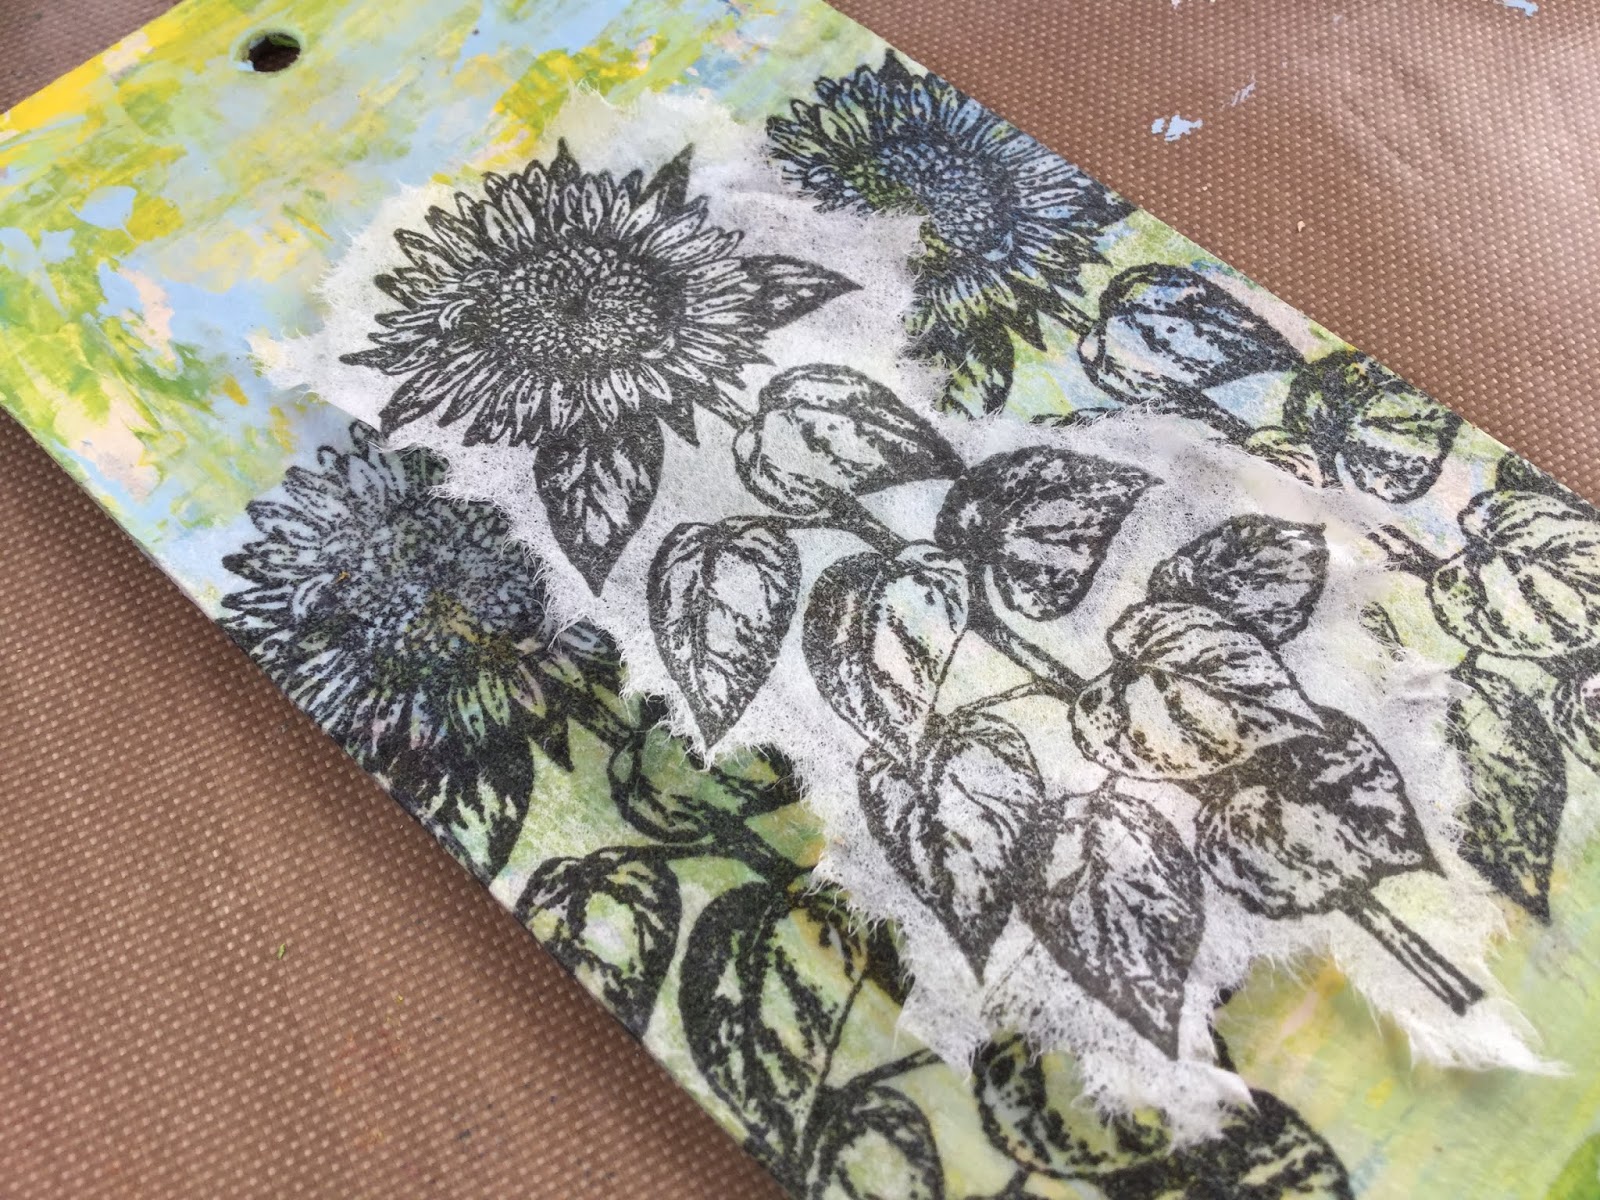

Painted with multi surface paints you see how the image 
continues along the edge of the tag...


A large flat back gemstone embellishes the middle sunflower with black and white 
pen bringing out parts of the image that may have been lost during painting.


Onto rice paper I stamped a sentiment from the same set and adhered it to the tag.

A ribbon bow attaches the tag to a card making it easier to be removed
if the recipient wishes to display it making an extra sweet little gift.

My *Be the Smile* Tag Card is complete.


Thank you for stopping by and please don't forget to check out what 
the super talented That's Crafty Team have created to inspire you.

Wishing the brightest of days
and Crafty Hugs

Tracey xx

Crafty Supplies:

That's Crafty: White/Greyboard Tag
That's Crafty Multi Surface Paints
That's Crafty Multi Purpose Glue
Large Flat Back Gem and Ribbon

Wednesday, 4 July 2018

Close to Nature ~ That's Crafty Challenge

Hello Creative Friends..

It's time for a new theme over on the That's Crafty Challenge Blog

If you would like to share your creative side with us we'd love to see you over HERE
There's prizes to be won so pop on over read those entry rules and check out 
what the talented That's Crafty Team have created to inspire you.

Here's my interpretation of the challenge..

Using the keyhole MDF book cover Surface I smeared on texture paste 
and used the back of a fork to make marks in the hope of simulating bark.


Leaves from the Butterflies and leaves set are stamped onto Kraft card and cut out. 
Using Flat Matte Sprays the leaves are painted with white also added to some of the areas.
This completely changes it's transparency creating more new shades.


With the Book Cover painted in multi surface paints, black is scraped around the 
edge of the key hole and heated with a heat tool till it bubbles to create a raised edge. 
Strips of dyed card help map out where the leaves will fall, all held down with gel medium.


Gel medium and twisted wire holds a variation of beads in place adding 
embellishment and breaking down the similarity of the leaves within the design.


The stencilled Rose used to test out texture and colour has been cut and applied to guide the eye to the key hole where you can just catch a peek at what lies behind the door.


The sentiment from Lynne's Wildflower stamps fits perfectly with this cover.

I'm building up a collection of pictures and boards that create 
intrigue through that keyhole before I string it all together.

The Secret Garden by Frances Hodgson Burnett was one of my Favourite reads as a child.
I would have loved to discover a Secret Garden just like Mary Lennox did...

Tomorrow I will share what lies through that keyhole.

Look forward to seeing your take on 

Creative Wishes
Tracey xx

Crafty Supplies:

That's Crafty: Surfaces MDF Book ~ Keyhole Cover
That's Crafty: Texture Paste
That's Crafty: Gloss Gel Medium
That's Crafty Stamps: Doodled Butterflies & Leaves
That's Crafty Stamps: Lynne's Wildflowers Set 1
That's Crafty: Multi Surface Paints
That's Crafty: Flat Matte Sprays
That's Crafty: Roses Stencil
Wire and Beads

Wednesday, 2 May 2018

A Stitch in Time ~ It's a Challenge

It's time for a brand new blog challenge over at That's Crafty
The theme this month is *A Stitch in Time* and we are asking you 
to share your faux or real stitch creations.

Here's what I got up too..

I first started with a piece of  wet organic cotton calico, laying 
the stencil on top and painting multi surface paint through it.


When dry I doodled around the outline of the flowers with a 
fine liner pen. Stabilised the fabric by gluing it onto a piece of card
and machine stitched around the edge.


A selection of buttons have been hand sewn for decoration and a couple for practicality.


Fabric dyed with multi surface paints has been used to back the inside with two extra pieces cut and sewn in along the central line to hold all those sewing accessories.


Keeping my fingers crossed that my measurements are correct it should fold together.

The larger of the buttons acts as a closure with a little piece of elastic 
which hooks around it keeping it all safe and sound inside.

Front


Back


A handy pocket sized needle book holding a few extras.


If you'd like to share your ideas and creations with us there's a prize of £30 
up for grabs for one lucky winner to spend in the That's Crafty online Store 
and in addition to that a stencil prize for each of the chosen Top 3.. 

Pop on over and check out what the Design Team have created just for you in the

Wishing you Sunshine and Creativity

Tracey xx

Crafty Supplies:

That's Crafty! Stencil ~ Daisy Background
That's Crafty! ~ Multi surface Paints
Calico/Card'Fine Liner
Buttons/Elastic cord and stitches

Wednesday, 4 April 2018

Going round in circles ~ it's a challenge!!

It's the start of a brand new blog challenge over at That's Crafty
with this months theme being *Going round in Circles*

Here's my take on this month theme
along with those *How to Do's*

Influenced by the colours on a tag found in my stash this tag was far to small 
to use with all those That's Crafty circular stamps and stencils
...So this time I've gone Large using an MDF GiganTAG..


Using a palette knife multi surface paint is scraped onto the GiganTAG 
along with texture pastes pushed through stencils with circular apertures 
all helping to build up that very large blank background area.


Diluted multi surface paint is sprayed into those raised stencilled areas.


White Gesso stippled through stencils adds areas of light and 
embossing stamped circle images with dark EP makes them pop.

Metallic multi surface paint highlights areas of raised texture.


Drips of heated UTEE break up those open areas adding extra interest. 

This gem and button filled wire circle was a pin brooch I never finished 
and judging by it's weight it was far too heavy for purpose, hence it's dormancy. 

3D Gel Medium helps hold it firmly in place along with other found embellishments.


I think I could have carried on and on with this as the space was so vast but after edging 
in black I decided to call it a day and tie it onto another GiganTAG I created last year. 

I now have a front and back cover 
to house large collage pages to keep them nice and flat.


If you'd like to share your ideas and creations with us there's a prize of £30 
up for grabs for one lucky winner to spend in the That's Crafty online Store 
and in addition to that a stencil prize each for the Top chosen 3.. 

Open worldwide come share your creativity with us over HERE
as myself and the Design Team go Round in Circles ..

Thank you so much for visiting
Creative Wishes
Tracey xx

Crafty Supplies:

That's Crafty ~ MDF GiganTAG
That's Crafty Stencils ~ Dot Mandala
That's Crafty Dinky Stencils ~ Bubbly all over ~ Half Circle ~ Punchinella
That's Crafty Mini Stencil ~ Bubbles
That's Crafty Texture Paste ~ Sand Paste
That's Crafty Multi Surface Paints
That's Crafty Clear Stamps ~ Motivational Words Set 2
       Textures Collection Set 1 ~ Set 2

Wednesday, 7 March 2018

The Green Man ~ That's Crafty *Spring into Action*

It's been all about the weather again and I know so many of you
are looking forward to seeing Spring finally break through.

To spur it along i'm sharing my Green Man
a symbol of rebirth in the hope that we do not have to wait too long
for Mother Nature to share her beauty with us all.

This project is to showcase the new That's Crafty Blog Challenge  
with this months theme being *Spring into Action*

Here is my Green Man
and how he came to be..

Onto a 4.5 x 9" whiteboard panel I mixed paints to create different shades
of green tracing the facial features of Max through the stencil.


Painting greyboard leaves and scoring leaf veins with a pokey tool, areas 
have been highlighted by heat embossing white embossing powder.


The facial features have been accentuated using glossy accents and painted when dry.
Some greyboard leaves have been used as a template drawn around onto paper 
and cut out enabling me to have more leaves to build up around the face.


Stamping the leaf stamp from the textures set 3 adds extra detail to areas of the leaves
and textured sand adds texture to some of those very flat leaves.


Mounted onto a 4.5 x 9" Chunkie I dabbed antique gold paint over those 
textured and raised areas and drew in more leaf veins with a white pen.

.. given more leaves I would have continued with an abundance of them.


Please pop on over HERE and see what the Design Team 
have been creating to inspire you..

We look forward to seeing your interpretations of the 

Creative Wishes
Tracey xx

Crafty Supplies:

That's Crafty: 4.5 x 9" White/greyboard panel
That's Craft Stencil: Max TC7012
That's Crafty Surfaces: LeavesAcorns and Leaves
That's Crafty Textures Stamps: SET 3
That's Crafty Chunkie: 4.5 x 9"
Embossing Pen/Embossing Powder
White Pen


Wednesday, 21 February 2018

*Butterfly heart* ~ I heart you (Part Two)

Hello creative friends.

It's time to remind you that *I Heart You*
and that there's still time to join in with the That's Crafty Blog Challenge.

Here is my mid month make with those *How to Do's..

Onto an MDF Tag I layered Texture paste through the floral heart stencil
and when dry added a layer of light texture paste over the top.


Two sizes of greyboard butterflies were glued together with detail drawn onto 
the wings very slowly. The Butterfly was then put aside and left to dry.


That's Crafty Multi surface Orange and Red give that bright colour.


Chestnut brown helps accentuate those veins with added dots of white posca.
A beaded wire body and antennae adds to that detail.


Mustard Yellow and a Lime wash is painted around the textured floral heart


with the raised flower painted in pearl metallic.


The Butterfly is adhered with glue gel and a sentiment created by piecing words together 
from Lynnes Affirmations set 3. Evergreen is dripped around the heart and edges darkened with  black blending ink.  A coating of 3D Gloss Gel completes my

*Butterfly Heart tag..*


I do hope you can join us over on the That's Crafty I Heart You Challenge
and I look forward to catching up with you all very soon.

Creative Hugs and Wishes
Tracey xx

Wednesday, 7 February 2018

Have a heart...That's Crafty Blog Challenge

It's the First Wednesday of the month which can only mean one thing!
It's the start of a Brand New challenge over on the That's Crafty Challenge Blog

This months theme is.. I Heart You and you can interpret it in anyway you wish.
There's a Prize for one random winner along with a prize for the top 3,
we really do hope you can come on over and share your creations with us.


Here is my *Have a Heart panel plaque's.. how to do's

On a 4.5 x 9" greyboard panel I created another faux wooden background like last month 
scoring with a pencil to create the tongue and groove appearance but this time dry brushing brown and white multi-surface paint, dragging those colours together.


 Stamping the wooden panel stamp from textures set 4 in random areas I embossed with tan embossing powder to raise up some areas to give that peeled paint effect.


Pushing texture paste through the daisy stencil I painted the whole heart 
in brown and bright red to create a deep ox blood colour.


Drying with a heat tool antique gold was brushed over those raised areas


Painting a greyboard word *Love* it was time to dress the panel plaque,
but not before giving the back panel a little distressing.
 Me and my trusty hammer are becoming inseparable.. hee hee!!


Glued onto the panel I pushed some latch hook scraps under the heart 
as it was looking a little flat, lost and lonely on its own. 

The word LOVE was glued on top with eyelets and a recycled red lace acting as its hanger.

My *Have a Heart* Panel Plaque is complete..


I love how the latch hook looks underneath the heart,
almost as if it is nesting..

I do hope you can join us for this months challenge
and please remember to pop on over and check out those inspirational makes 
from the That's Crafty Design Team we look forward to seeing you THERE.

Wishing you much creativity

Crafty Hugs Tracey xx

I'd like to enter this into the: Try it on Tuesday *Love is in the Air* Challenge.

Crafty Supplies:
That's Crafty Grey/Whiteboard Panel: 4.5 x 9"
That's Crafty Grey/White board #8 Heart
That's Crafty Multi Surface Paints: 
That's Crafty greyboard surfaces: Bits and pieces Sentiments 2
That's Crafty Texture Paste
That's Crafty Stencil: Daisy Background TC8019
That's Crafty Stamps: Textures Collection Set 4 
Scraps of latch hook canvas


Wednesday, 24 January 2018

Feeling Blue reminder

Here's a reminder that there is still time to join in with the 
That's Crafty Monthly Blog Challenge *Feeling Blue*

Here's another project this time using some delicate Blue Hues..
and those *How to do's*..


Painting an 8 x 8 greyboard panel with white Gesso, I pushed texture paste through the
beautiful intricate Mandala stencil. When completely dry I lay down the stencil over the top and repeated again sealing with another layer of Gesso. When that was dry laying the stencil down for a final time I dabbed on textured sand paste to create a little more texture.


Watering down Ocean and Teal multi surface paint in a small spray bottle I sprayed the
mixture on to the panel, allowing the colours to drip down the raised mandala.
Watered down Chestnut brown was sprayed to add contrast.


Highlights of gold were adding using my finger and flicks and drips
 of white seemed to bring those delicious colours together.
A turquoise embellishment helps to focus the eye.


Randomly stamping the script stamp the panel was edged with gold and
an Affirmation from Lynnes Stamp Set 4 stamped bottom right.

My Mandala panel piece is complete..


I've really been enjoying visiting those that have entered the
That's Crafty Challenge this month and hope to see many more
before the Feeling Blue Challenge finishes at midnight on 6th February.

Hope to see you there.

Creative Wishes
Tracey xx

Crafty Supplies:

That's Crafty 8 x 8 Greyboard panel
That's Crafty 8 x 8 Stencil: Mandala TC8014
That's Crafty Texture Paste
That's Crafty Textured Sand Paste
That's Crafty Stamps: Lynnes Affirmations Set 4
That's Crafty Textures Stamps Set 3
Multi Surface Paint: Ocean - Teal - Chestnut Brown - Gold - White
White Gesso
Central embellishment from my stash...

Wednesday, 10 January 2018

January - Feeling Blue challenge!

It's all change over on the That's Crafty Challenge Blog,
Not only are we Celebrating a New Year but Wednesday will now be
the New Challenge day with a different theme given to you every month.

The challenge is open to everyone with a £30 Voucher for one random winner.
The Design Teams Choice of the Top 3 will also receive a prize!!
*Please read those new RULES*


Not sure about you but January has never been a favourite month of mine,
after spending time preparing the festivities for family then lots of quality
time with them the beginning of the New Year always seems quite empty!

January's Feeling Blue Challenge really sums up the month for me..

Here's my take on the theme.. and those how to do's!


Using a white/greyboard 4.5 x 9" panel I brushed on a variety of That's Crafty paints in different shades of blue, mixing in a small amount of Gesso to give a chalkier effect.

When dry I rough sanded the panel spritzed with water and etched into the board
 with a rubber tipped sculpting tool to give a peeled paint effect.


Filling in the white space with black Gesso I drew lines into the panel with a pencil 
to create grooves, stamped using set 3 from the Textures set then tapping across 
the panel with a hammer to give the faux wooden panel a more rustic look.


Using the  8x8 Alphabet Stencil I traced around the letters needed
and stamped the wooden panel stamp over the letters using archival ink.


With the letters cut out and coloured using distress ink, the greyboard houses were painted in a combination of Blues, stamping with Gesso and Textures stamps from set 3 & 4 adding a sprinkling of frantage before those little doors and windows were glued on.


3D gloss gel has been mixed with yellow and pearl paint giving light to the windows. 
Layering it all onto my faux wooden panel adding dyed hessian and wire to add an 
element of intrigue..


My *Feeling Blue* Challenge project is complete..


I do hope you can join in with the challenge over HERE
the Design Team would love to see your Feeling Blue creations.

Or just pop on over and see the inspirational makes from the team
there will be more during the month to inspire you further.

Wishing you everything creative in 2018
Warm wishes Tracey xx

Crafty Supplies:
That's Crafty Surfaces Bits and Piece: Houses
That's Crafty White/Greyboard Panel 4.5 x 9
That's Crafty 8x8 Alphabet Stencil TC8001
That's Crafty Multi Surface Paints: Bright Blue - Teal - Ocean
Dark Blue ShimmerMetallic Ice BlueMustard Yellow
That's Crafty Gesso - White - Black
That's Crafty Textures Stamps - Set 3 - Set 4
That's Crafty 3D Gloss gel Medium
That's Crafty Multi Purpose Glue PEN
Distress Ink- Aged Linen - Archival Watering Can
Frantage embossing powder - Aged Aqua
Wire/Dyed Hessian & a button.