Pages

Friday 19 May 2017

From dispose to compose..

This little make was totally unplanned but i'm blaming Lynne Moncrieff for the distraction with her enticing and ever inspiring blog this week. I too have stash that I just look at, save for that special project or just don't use because it's far to nice, I feel so guilty about it. 

So whilst on the super stash hunt I came across a not so super jar of oddments, unappealing, uninspiring and one step away from being thrown away but 


before I got that far I found myself analysing the contents asking myself 
what was wrong with it and why did I want to get rid of it..?? 
Well when you start asking yourself  why you want to throw stuff away it becomes 
a little worrying... Sounds like a good time to make something!

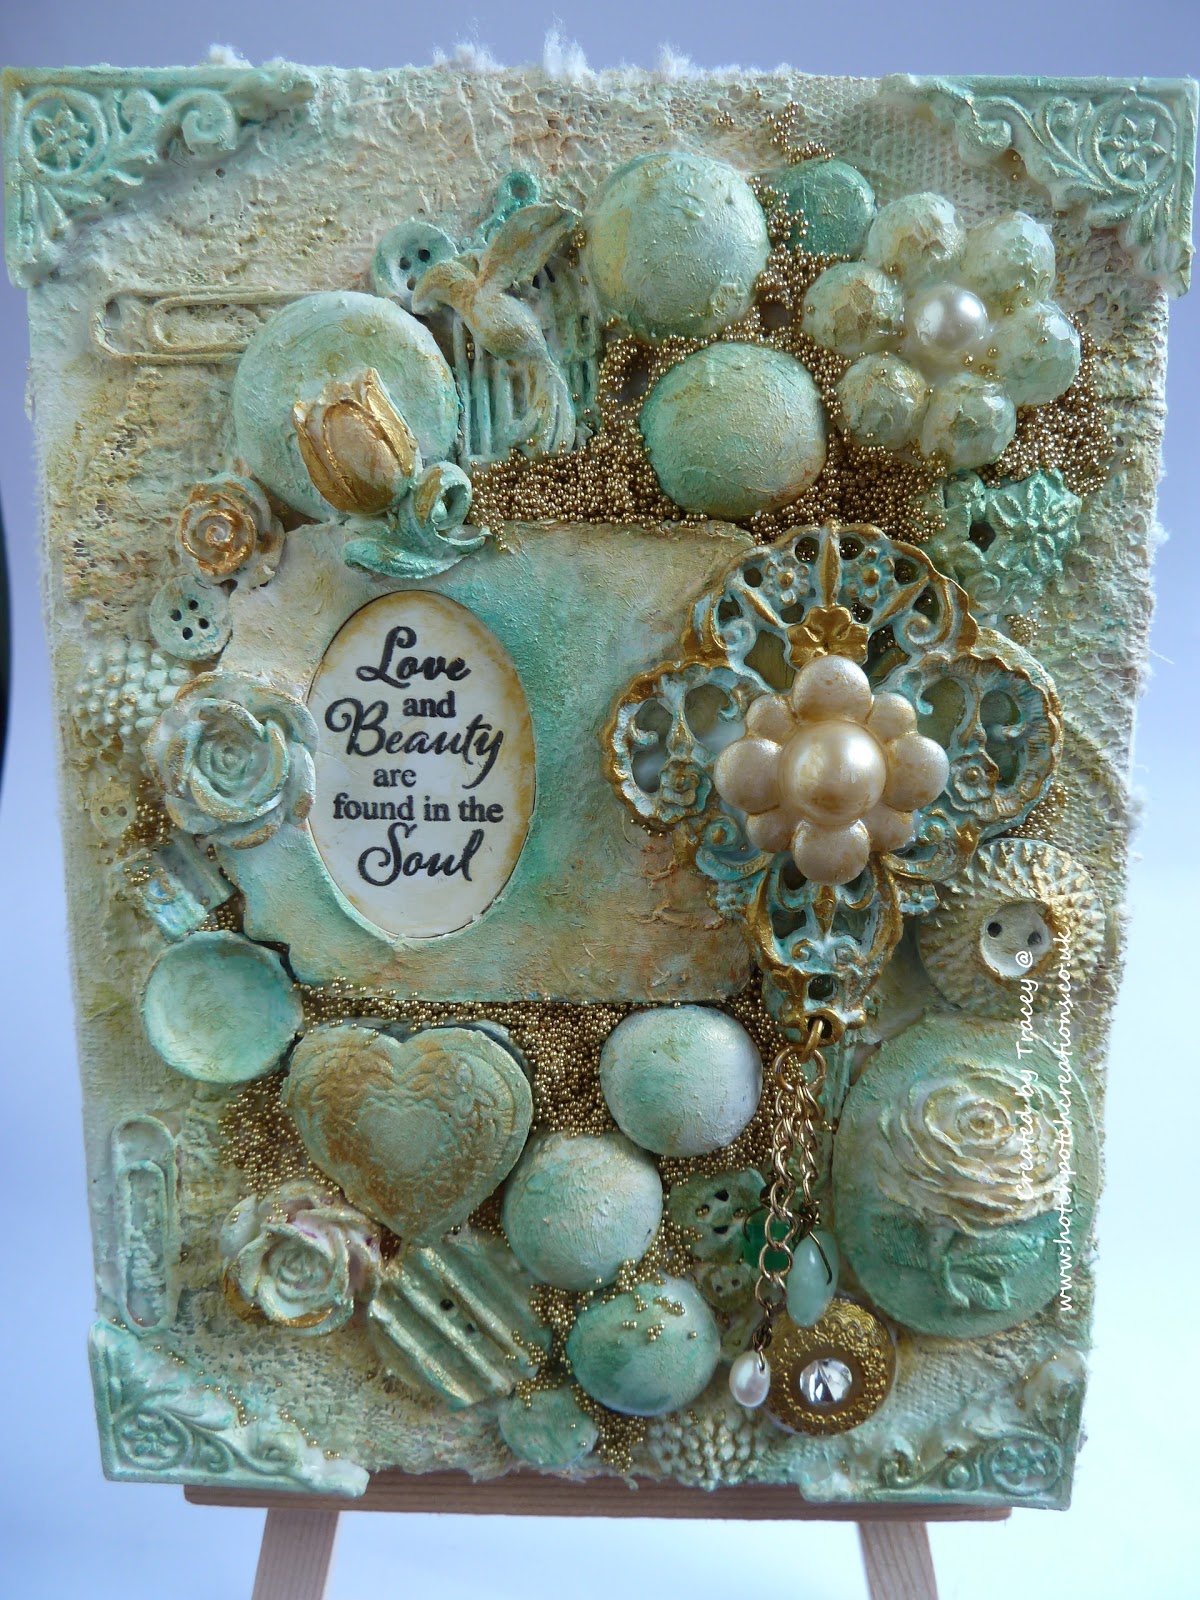
Here is my *Dispose to Compose* Canvas in words and pictures.

Using a 5x7 Lace covered canvas I glued on the oddments along with an embossed and stamped aperture tag. When dry the whole canvas was painted in white Gesso repeating the process until the embellishment were completely covered.I gradually added colour  using water soluble wax pastels activating with water and reapplying when dry.


When the colour build required was achieved 


I applied VersaMark watermark pen around the edges of the embellishments 
and dusted with Green and Gold pigment powders. 


Gaps between the embellishments were filled with glue and micro beads sprinkled atop. 


With a fitting sentiment placed in the frame window and a 
large charmed focal embellishment my Canvas is complete.


I've seen some amazing pictures and canvas's produced using similar techniques to this and I have to agree they can transform any old bits and bobs into a masterpiece. 
The problem now is I'm not too sure I will throw anything away after creating this..!

Thank you for your company.. Have a fabulous weekend.

Creative Hugs Tracey xx

Crafty Supplies:

5x7 Canvas
Embellishments, bits, bobs, Micro Beads and a sentiment.
Caran D'Ache Neocolor II Summer Edition
IndigoBlu Luscious Pigment Powder Green and Gold
Versamark WaterMark pen

Tuesday 16 May 2017

Thanks a *Bunch* ..

Another quality set of stamps from Rubber Dance Stamps this set Bonny Bunny is a real fun theme and one of two *New Sets Designed by Donna Gray.


I first stamped the larger carrot onto Shrink Plastic and coloured using alcohol markers, carefully cut around the images leaving an edge and punched a hole for a jump ring to be attached when shrunk.


This is the Carrot before and the Carrot after shrinking down in the oven.


I covered a Tag in a piece of mixed media scrap paper from my mini scraps journal and sanded the edges back.


Distressed around the edges using Rusty Hinge the smallest carrot stamp has been stamped onto the background and coloured using the same alcohol markers used to colour the shrink plastic ones. The Bunnies whiskers have been stamped around the tags edge to break up the design.


Jump rings are attached to the shrunken carrots and then fixed to a finding to create a pendant. A long chain is added to create an over the neck necklace.

The stamped words are by Craftwork cards although I did have to create the word bunch by masking and stamping letters from words in the set.


Attached to the tag by tying a ribbon through the top this would make a great gift for someone especially those Bunny lovers out there and I *Carrot believe that my Daughter has already put her claim on this one.. (sorry that was irresistible..!!)

I'd like to enter this in the Rubber Dance Rule of Three Challenge

Enjoy the rest of you week everyone.. and Thank you for stopping by.

Hugs Tracey xx

Crafty Supplies:

That's Crafty! - Tag
Rubber Dance Stamps - Bonny Bunny
Rubber Dance Stamp UK Supplier Bonny Bunny!
Tim Holtz Rusty Hinge Distress Ink
Versafine Onyx Black Ink Pad
Craftwork Cards - Label Tape Sentiments
Shrinkles Shrink Plastic
Findings & Ribbon.

Friday 12 May 2017

May Tag.. Time to Celebrate

May..!! What an eventful month and we are not midway yet. Lots of highs for me, 
lets not mention the flu bug that's tried to put a damper on things!  
One piece of uplifting news was being announced as one of four new additions to the superb That's Crafty Design Team, I had been sitting on this exciting announcement for quite some time and am so happy the cat is now out of the bag.

Thank you so much to Laura for thinking me worthy enough to be part of your DT family I'm looking forward to working alongside you all and sharing my first DT piece very soon. 

Meanwhile here is my May Tag using those prompts from the 12 week Tag Challenge


Priming a That's Crafty " Tag in white Gesso I covered in a layer of Marigold Acrylic Paint, then brayerd Calypso Blue Acrylic over the top. Using Modelling paste I chose to use it to press ribbon and threads onto my tag as collage.
A layer of diluted gold has been painted on top.


White acrylic has been splashed onto the tag and structure paste pushed through a stencil.
A coating of clear gesso has been applied all over and Rubber Dance little stamps stamped around the edges.


Good old gilding wax has helped bring out the detail with some pre-cut bunting found amongst my stash used as my focal image. I used a Tim Holtz words sticker, doodled and coloured the stamped images with posca marker pens and added a detailed button to embellish and highlight the *Celebrate* sentiment. Ribbon has been coloured with alcohol markers to co-ordinate with the bunting.


and my May Tag is complete. I do love all the hidden texture amongst these tags and when highlighted with gilding wax it's more like hidden treasure. I only wish my photography did all that treasure justice. Thank you again Chris* for those 12 weeks of wisdom..

Have a safe and happy weekend everyone..
Hugs Tracey xx

Crafty supplies:

DecoArt Americana: Marigold
DecoArt Americana: Calypso Blue
DecoArt Media Metallic Fluid (Gold)
DecoArt Modelling Paste
Imagination Crafts Structure Paste
Pebeo Gilding Wax Antique Gold
Posca Marker Pens
Rubber Dance Stamps UK Retailer
Ribbon, threads and a decorative button..

Tuesday 9 May 2017

Paperbabe Girl in profile.

I have had the Paperbabe profile templates for nearly a year now and apart from cut them out and test how it was possible to create different profiles I had not used them to their full potential, I was over the moon when I saw that Kim had started the Paperbabe challenge blog up again so decided there was no better time than this to get them out and have a play.

Here is a breakdown in words and pictures of my Girl in Profile Canvas.


Using a 8 x 8" canvas board I pressed an acrylic prepped 6 x 6" gelli plate into the middle of the board and drew around the face template adding the long fringe hairstyle. 


The face has been coloured using Caran D'ache Neocolor and facial features created using
 paperbabe profile face stamps. Both eye and lips are coloured using Posca markers.


The hair has been created by building up colour using inktense pencils from light to darker shades and activating with water. A heavy wash of water has been painted around the outer edge of the hairline and allowed to drip by turning the canvas on its side.


Oriental Zen flowers have been stamped with mixed media glue and gilding flakes burnished on top, the flowers have been coloured using Wink of Stella brushes and alcohol markers..


A heavy wash was added around the flowers this time and again turned on it's side allowing the stained water to run down the canvas creating a delicate effect.
Stickles and Wink of Stella brushes have helped to add the final details and 
my Girl in profile canvas is complete.


I really enjoyed creating this canvas, it's been a long time since I produced something like this and does take me back to my college days. Fingers crossed these wonderful templates do not lay in wait for another year.

I'd like to enter this in the Anything goes Paperbabe Challenge..
Come on over and join in the fun...

Have a wonderful week everyone..
Hugs Tracey xx

Crafting supplies:

Caran D'Ache Neocolor II 
Wink of Stella Brush
Ranger Stickles Glue

Friday 5 May 2017

Fresco style album page

Only one post from me this week as it's been a busy one & I've been blessed with the dreaded Lurgy so full of coughs, sneezes and wheezes so apologies in advance for any typo's or incorrect links as it's quite difficult to type and sneeze at the same time.
Thought I'd share my latest  Journal cover using PaperArtsy and Rubber Dance Stamps.


The style I was aiming for was Flaking Fresco, like ancient mural plaster painting.
By applying Coral Rose and English Rose acrylic randomly over a coat of white gesso this is dried with a heat tool until tacky dry. A coating of Calypso Teal covers it all and dried using a heat tool again. When dry I rubbed over areas of the journal board with a wet wipe exposing the colours underneath. .. which does resemble flaking Fresco.!


For the front focal piece I decorated a Tando substrate in the same way as the chip board album page using Coral Rose, Tangerine Dream and Calypso Teal. I stamped a PaperArtsy Zinski image and Rubber Dance texture stamps around the main image.


Doodling with Posca Pens and embellishments finish off the substrate when glued to the front page. I'm not sure if this is finished yet I may add a few words or a title, but for now I'm putting my pens and paint down. I'm hoping to fill this with lots more Fresco style pages.


I'd like to enter this page into the Orange, Red and Rose Rubber Dance Colour Challenge

Wishing you all a Happy, Healthy lurgy free weekend..

Hugs Tracey xx

Crafty supplies:

English Rose Acrylic Paint
Coral Rose Acrylic Paint
Calypso Teal  Dylusions Paint
Post Box Red Dylusions Paint
Tangerine Dream Dylusions Paint
Posca Marker Pens/embellishments