Pages

Tuesday 30 January 2018

A little piece of January..

Good Tuesday everyone,

As January is near to closing it's door i'd like to share one of my *very own* with you..

This is a BIG step for me as my personal drawings I do not share on here.
It's a brave step for me but I feel now is the right time to make that artistic step.

This is my little piece of January..


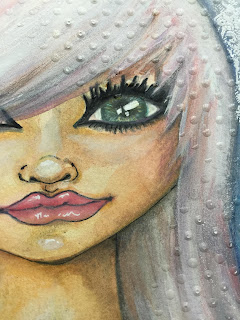
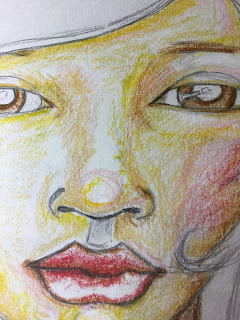
In a A3 watercolour sketch book I've pencil drawn features, added colour with
water soluble pencils and activated with water. Continuing to build up the base by
laying down more pencil to achieve a skin tone I was happy with.


.. and the next steps are where I loose myself spending hours
with water resistant pencil, intensifying colour, building up shadow
and adding in detail. I love how the Luminance pencil blends seamlessly.


.. and here she is in full.
I'm not sure if she is completely finished yet as I often go back 
and add more but for the moment I am happy enough to share..


I sketch and doodle all the time, it's something I have done since infancy
and decades before it became popularised as a mindful activity!
I know it helps me to focus and problem solve but the main thing is
it's the one thing that helps me to switch off..!

I think we all need a little bit of that once in a while.. don't you?

Now it's time to take a deep breath, take those BIG steps and press publish..!

Wishing you a wonderful day..

Creative Hugs
Tracey xx
Thursday 25 January 2018

Earth and Air..

Hello Creative Friends

I'm sharing not one but two creations over on the That's Crafty Blog today

Here's a sneaky peek..


with the finished projects and how they came to be over HERE..

Wishing you a wonderful day and
a creative weekend ahead.

Crafty Hugs
Tracey xx

Wednesday 24 January 2018

Feeling Blue reminder

Here's a reminder that there is still time to join in with the 
That's Crafty Monthly Blog Challenge *Feeling Blue*

Here's another project this time using some delicate Blue Hues..
and those *How to do's*..


Painting an 8 x 8 greyboard panel with white Gesso, I pushed texture paste through the
beautiful intricate Mandala stencil. When completely dry I lay down the stencil over the top and repeated again sealing with another layer of Gesso. When that was dry laying the stencil down for a final time I dabbed on textured sand paste to create a little more texture.


Watering down Ocean and Teal multi surface paint in a small spray bottle I sprayed the
mixture on to the panel, allowing the colours to drip down the raised mandala.
Watered down Chestnut brown was sprayed to add contrast.


Highlights of gold were adding using my finger and flicks and drips
 of white seemed to bring those delicious colours together.
A turquoise embellishment helps to focus the eye.


Randomly stamping the script stamp the panel was edged with gold and
an Affirmation from Lynnes Stamp Set 4 stamped bottom right.

My Mandala panel piece is complete..


I've really been enjoying visiting those that have entered the
That's Crafty Challenge this month and hope to see many more
before the Feeling Blue Challenge finishes at midnight on 6th February.

Hope to see you there.

Creative Wishes
Tracey xx

Crafty Supplies:

That's Crafty 8 x 8 Greyboard panel
That's Crafty 8 x 8 Stencil: Mandala TC8014
That's Crafty Texture Paste
That's Crafty Textured Sand Paste
That's Crafty Stamps: Lynnes Affirmations Set 4
That's Crafty Textures Stamps Set 3
Multi Surface Paint: Ocean - Teal - Chestnut Brown - Gold - White
White Gesso
Central embellishment from my stash...

Sunday 21 January 2018

Fishy wishes..

Happy Sunday everyone,
I hope you are all fit and well??

I have been trying to organise my crafting life and sort through
my stash whilst suffering with a horrid virus again!!.. Ewwww

Having had to pack most of my stash away during Christmas, each year
I find it harder and harder to get it out and sort through it all again!

..but i'm being ruthless this year, through the coughing and sneezing!!

Here's a quick card I made for a 70th Birthday

Simply stamped onto watercolour card with versafine
I coloured with promarkers, I know it's not advised to use
alcohol markers on watercolour card as it can be very thirsty but I
really do love the way it holds the colour making it even more vibrant.


With a watery wash of watercolour around the trio I
covering the card with versamark embossing ink and triple embossed
with clear embossing powder giving a crisp and shiny surface.


Bending the card cracks the embossed surface...


and a little ground espresso distress ink helps to bring out those cracks!


Mounted onto an 7 x 5" card I decided not to put the big 70 on the front
and chose to place it inside as I knew the fish loving receiver would probably
want to keep this card up to remind him of his hobby rather than his age...!!


Apologies to those blogs i've not payed a visit to yet, comments and email I've left 
unanswered. I'm hoping to have a catch up later today when my heads a little less foggy.

Wishing you a relaxing Sunday.

Warm Hugs & Wishes
Tracey xx

Supplies:
Carabelle Studio Stamp ~ Fishes
Promarkers/Aqua Markers
Versamark/Versafine ~ Onyx Black
Clear Embossing Powder/Heat Tool
Ground Espresso Distress Ink


Friday 19 January 2018

Ultra Violet Paperbabe Postcard: Challenge #65

It's time for another Challenge over at Paperbabe Stamps
with this Fortnights theme being a Picture Inspiration Challenge #65 
inspired by the Pantone colour of 2018 Ultra Violet.


Described as provocative, thoughtful and a dramatic shade of purple
I have tried to introduce each of these elements into my project.

Here is my Ultra Violet Papebabe Postcard and those How to do's

Using the mini portrait template, face stamps and hair template I positioned,
sketched around, stamped then lay down my dominant water soluble colours 
scribbling them onto watercolour card and activated with water.


Building up the detail of the eyes, skin, and hair more colour was added to the background helping define the hair. Rubbing a wet wipe over a stencil I had placed over the background area I lifted off some of that dark colour leaving the impression of the stencil behind.


Lilac Glitter lips and eyelashes adds a dramatic touch!
With the final detail added using a fine liner.


An embossed rose embellishment gives her a corsage choker
necklace with those final hair highlights added with a white pen.

My Ultra Violet Paperbabe Postcard is complete..


It's Friday and the weekend awaits, hopefully with lots of 
spare time to craft away those chill out hours?? 

I hope you can find time to pop on over HERE and see the Design Teams
Super inspirational makes and hopefully join in with the challenge too!

Hope to see you over THERE.

Have a wonderful weekend
Creative HuGs
Tracey xx
                                                                  
Paperbabe Supplies:

Paperbabe - Mini Face Stamps
Paperbabe Mixed Media Template - Blunt Bangs Long Portrait


Thursday 18 January 2018

Patchwork Metal Tiled Plaque

Hello Creative Friends

I'm sharing a plaque today created using both sets of newly released
That's Crafty Natures Faces Stamps Designed by Melina Dahl.

Here's a sneaky peek of my creation with the full
project, pictures and how to do's over HERE..


I do hope you can pop on over and take a look.

Take good care everyone and have a super day.

Creative Hugs
Tracey xx

Thursday 11 January 2018

Monochrome panel

Hello everybody!!

I'm over on the That's Crafty Blog today with my first Thursday post of the year.
Here's a sneak peek with the full How to Do's over HERE..


Thank you for sharing your time
I look forward to sharing more of mine with you
same time next Thursday.

Crafty Hugs
Tracey xx

Wednesday 10 January 2018

January - Feeling Blue challenge!

It's all change over on the That's Crafty Challenge Blog,
Not only are we Celebrating a New Year but Wednesday will now be
the New Challenge day with a different theme given to you every month.

The challenge is open to everyone with a £30 Voucher for one random winner.
The Design Teams Choice of the Top 3 will also receive a prize!!
*Please read those new RULES*


Not sure about you but January has never been a favourite month of mine,
after spending time preparing the festivities for family then lots of quality
time with them the beginning of the New Year always seems quite empty!

January's Feeling Blue Challenge really sums up the month for me..

Here's my take on the theme.. and those how to do's!


Using a white/greyboard 4.5 x 9" panel I brushed on a variety of That's Crafty paints in different shades of blue, mixing in a small amount of Gesso to give a chalkier effect.

When dry I rough sanded the panel spritzed with water and etched into the board
 with a rubber tipped sculpting tool to give a peeled paint effect.


Filling in the white space with black Gesso I drew lines into the panel with a pencil 
to create grooves, stamped using set 3 from the Textures set then tapping across 
the panel with a hammer to give the faux wooden panel a more rustic look.


Using the  8x8 Alphabet Stencil I traced around the letters needed
and stamped the wooden panel stamp over the letters using archival ink.


With the letters cut out and coloured using distress ink, the greyboard houses were painted in a combination of Blues, stamping with Gesso and Textures stamps from set 3 & 4 adding a sprinkling of frantage before those little doors and windows were glued on.


3D gloss gel has been mixed with yellow and pearl paint giving light to the windows. 
Layering it all onto my faux wooden panel adding dyed hessian and wire to add an 
element of intrigue..


My *Feeling Blue* Challenge project is complete..


I do hope you can join in with the challenge over HERE
the Design Team would love to see your Feeling Blue creations.

Or just pop on over and see the inspirational makes from the team
there will be more during the month to inspire you further.

Wishing you everything creative in 2018
Warm wishes Tracey xx

Crafty Supplies:
That's Crafty Surfaces Bits and Piece: Houses
That's Crafty White/Greyboard Panel 4.5 x 9
That's Crafty 8x8 Alphabet Stencil TC8001
That's Crafty Multi Surface Paints: Bright Blue - Teal - Ocean
Dark Blue ShimmerMetallic Ice BlueMustard Yellow
That's Crafty Gesso - White - Black
That's Crafty Textures Stamps - Set 3 - Set 4
That's Crafty 3D Gloss gel Medium
That's Crafty Multi Purpose Glue PEN
Distress Ink- Aged Linen - Archival Watering Can
Frantage embossing powder - Aged Aqua
Wire/Dyed Hessian & a button.

Friday 5 January 2018

Winter's Day..

*Happy New Year from all at Paperbabe*

Today see's a new challenge over on the Paperbabe blog
with the theme being *Anything Goes #64*

My piece was inspired by the snow fall we had over the Festive Season
a scene we only seem to see on Christmas cards during winter time now.


Here is my Winter's Day How to do's..

Using a sheet of 10 x 7 watercolour card I sketched around the main standard 
Flick & Fringe hair template placing the small face template in the centre and 
drawing around it along with the torso included in the template set. 

The markings for the facial features are all marked out on the Face templates 
making it easy for you to trace the lines and stamp those features in. I moved the 
fringe template down to slightly cover the eyes and traced the outline on.


Using water-soluble wax pastels I first laid down the skin tone colours,
building up the surrounding areas with colour and shade activating it all with water.


White Gesso helped to cover up any stamped areas I no longer required.
Hiding the eyebrows now gave me a full fringe to work with again using 
water-soluble wax pastels along with water-resistant pencils to add the finer detail.


Inking through the herringbone stencil added interest to her garment.


Snowflakes from the Peaceful Flurries set have been stamped and embossed on the 
background with gel paste pushed through the mini dots stencil randomly across the page.


adding dimensional dots almost replicates snowfall.


Mounted onto black card my page was edged with machine stitching. 

Peaceful Flurries substrates were stamped and embossed using their sister Peaceful Flurries stamps and adhered to the page adding a button or two for embellishment .


My Winter's Day portrait is complete.


Thank you for stopping on by, 

Please pop on over HERE to see the fabulous creations from Kim and the Design Team
and share your creativity with us all by joining in with the *Anything Goes #64 challenge*

It's open to everyone and there's a prize to be won for one lucky winner!!...

Hope to see you over there..
Creative Hugs
Tracey xx

Paperbabe Supplies:

Paperbabe Standard Head and Torso  Portrait template
Paperbabe Standard Flick & Fringe Portrait template
Paperbabe Standard Female Face Portrait Stamp Set
Paperbabe Peaceful Flurries Stamps
Water-soluble wax pastels & Water resistant pencils